
AirAware Map
User manual
The drone pilot's companion for UK airspace: the live map, Fly Now checks, flying weather, your drones, flight plans with a risk assessment, a flight log and messaging.
Chapter 1Welcome
AirAware Map helps you decide whether, where and when you can fly your drone in the UK. It puts airspace restrictions, NOTAMs and local hazards on one live map, checks the spot you are standing on, and gives you a flying forecast for your own aircraft.
What you can do with it
| Part of the app | What it does |
|---|---|
| Live Map | Airspace zones, NOTAMs, airfields, danger areas, parks, schools, hospitals, obstacles, other pilots' planned flights and council drone rules, all on one map. |
| Fly Now | Scans the place you are standing (or a spot you choose) and gives a clear result (CLEARED TO FLY, CAUTION – REVIEW or DO NOT FLY) with a written brief and an Open category check for your drone. |
| Weather | A 24-hour forecast for any place (and a 7-day forecast on Pro), with wind at flying height and the solar activity (Kp) index that affects GPS. |
| Equipment | Your drones, their wind limits and class marks, so weather and Open category decisions use your aircraft's real details. |
| Flight Plans | Publish where and when you plan to fly, and build a site survey and risk assessment you can complete on site, sign and save as a PDF. Other pilots see your plan on the map. |
| Flight Log Pro | Your own record of flights flown, laid out like a paper pilot logbook with running totals. |
| Inbox Pro | Message other pilots, for example to agree who flies where. |
| Account | Your username, details, qualifications, plan, settings (look, units and text size) and blocked pilots. |
How to use this manual
The chapters follow the order you will normally use the app: set up your account (Chapter 2), learn the map (3), check a spot with Fly Now (4), look at the weather (5), then add your drones (6), plan a flight and complete its risk assessment (7) and keep your flight log (8). Chapters 9 to 11 cover messaging, your account and the Free and Pro plans. Chapter 12 helps when something does not work.
The screenshots show the phone layout. Features marked Pro need a Pro subscription; everything else is on the Free plan. New in version 2: the Flight Log (Chapter 8), risk assessments with on-site checks, notes and signature on each flight plan (Chapter 7), the Open category check in Fly Now (Chapter 4), qualifications and settings on the Account page (Chapter 10), the lighter Navy Bars look, and upgrading inside the phone apps (Chapter 11).
Chapter 2Getting started
Creating your account
Install the AirAware app from Google Play (Android); the iPhone app from the App Store is to follow. You create your account on the AirAware Map website, then log in to the app with the same email and password. Everything in the app, the map included, needs you to be logged in.
A new account has full Pro access for its first 72 hours, so you can try everything. After that it moves to the Free plan, unless you have subscribed to Pro (Chapter 11).
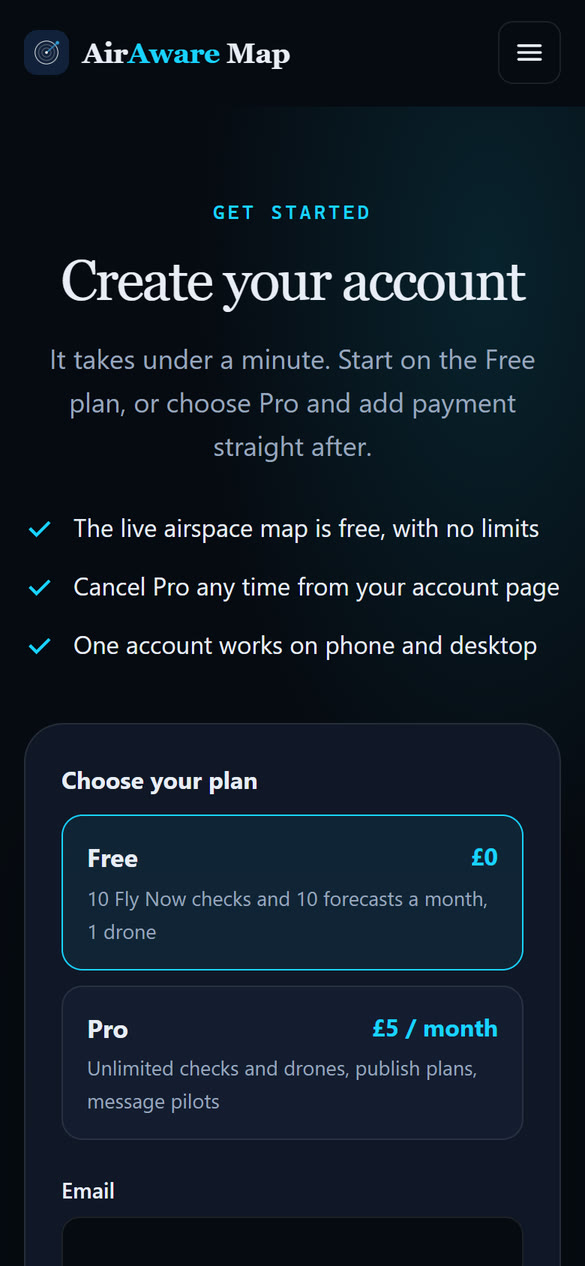
- Open the AirAware Map website and tap Start free. (To start on Pro, choose Get Pro instead.)
- Choose your plan: Free or Pro.
- Enter your email address and a password. The password needs at least 8 characters, including a number and a special character (for example ! ? # $ %). Enter it again to confirm.
- Complete the short verification check, then tap the button to create your account.
- Check your inbox for the confirmation email and tap the link in it. A page confirms your email address.
- If you chose Pro, you are taken to a secure payment page next. Use the same email address, so Pro switches on for your account.
Logging in
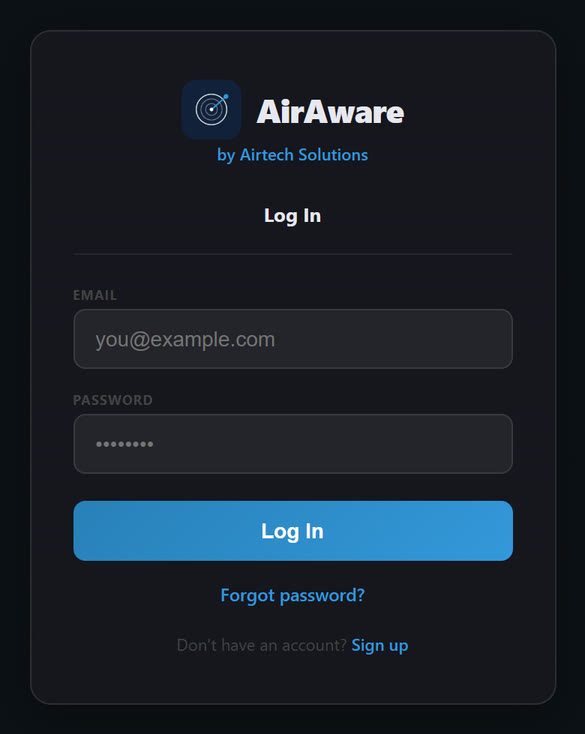
- Open the app and enter your email and password.
- Tap Log In.
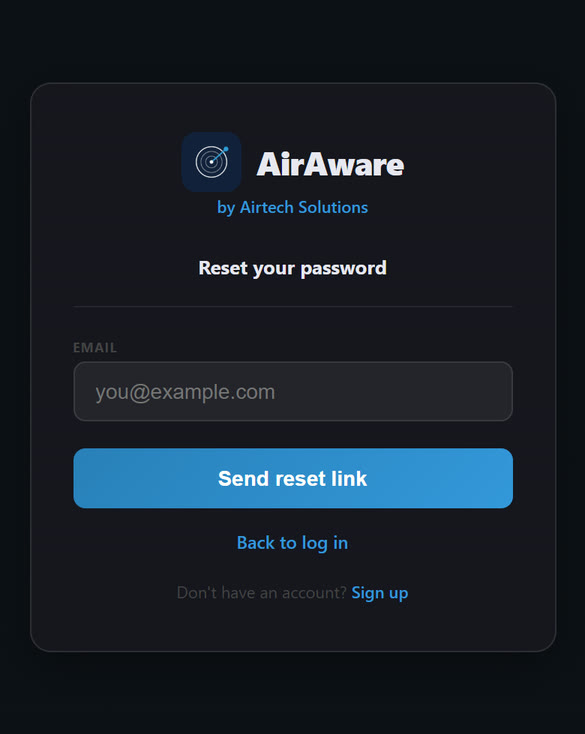
Forgotten your password? Tap Forgot password?, enter your email and tap Send reset link. Open the email, tap the link and choose a new password (again at least 8 characters with a number and a special character). Then log in as normal. Reset links only work once and expire after a short time; if yours has expired, ask for a new one.
To log out, tap Logout at the top of the Home screen and confirm.
The Dark / Light switch at the top right of the login screen chooses how the app looks (see Settings in Chapter 10).
One device at a time
An account is signed in on one device at a time. When you log in on a new phone or tablet, the place you were logged in before is signed out, and the login screen there tells you why. Nothing is lost: your drones, flight plans, flight log and settings belong to your account, so they are all there when you log back in.
If you are signed out when you did not expect it, someone (possibly you) has logged in to the same account somewhere else. If it was not you, change your password (Logging in).
The Home screen
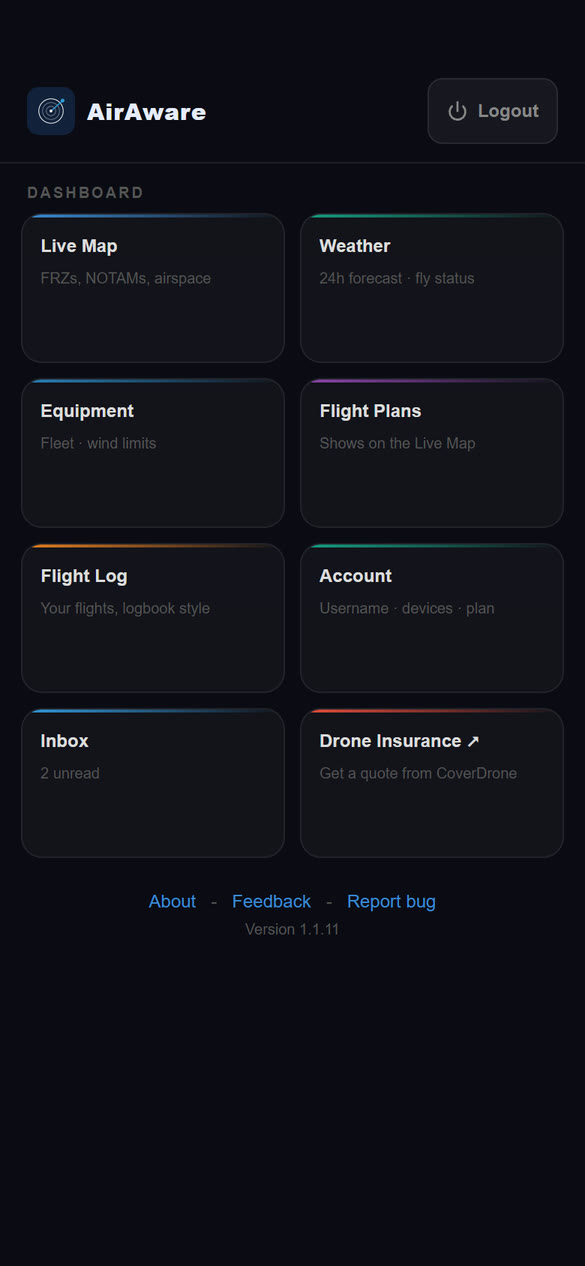
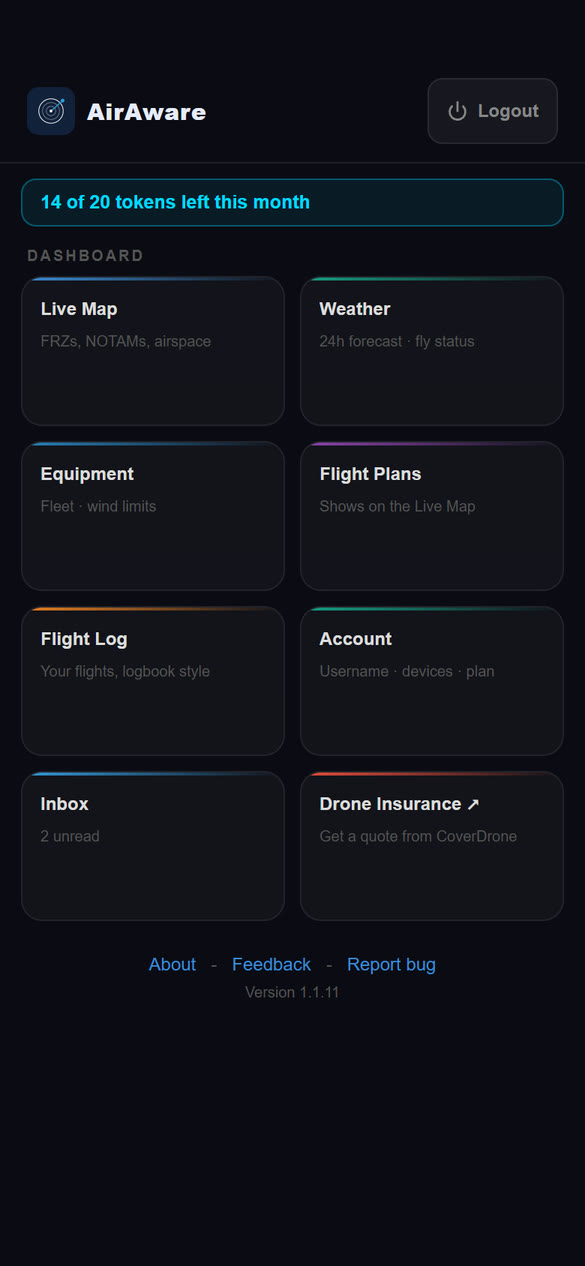
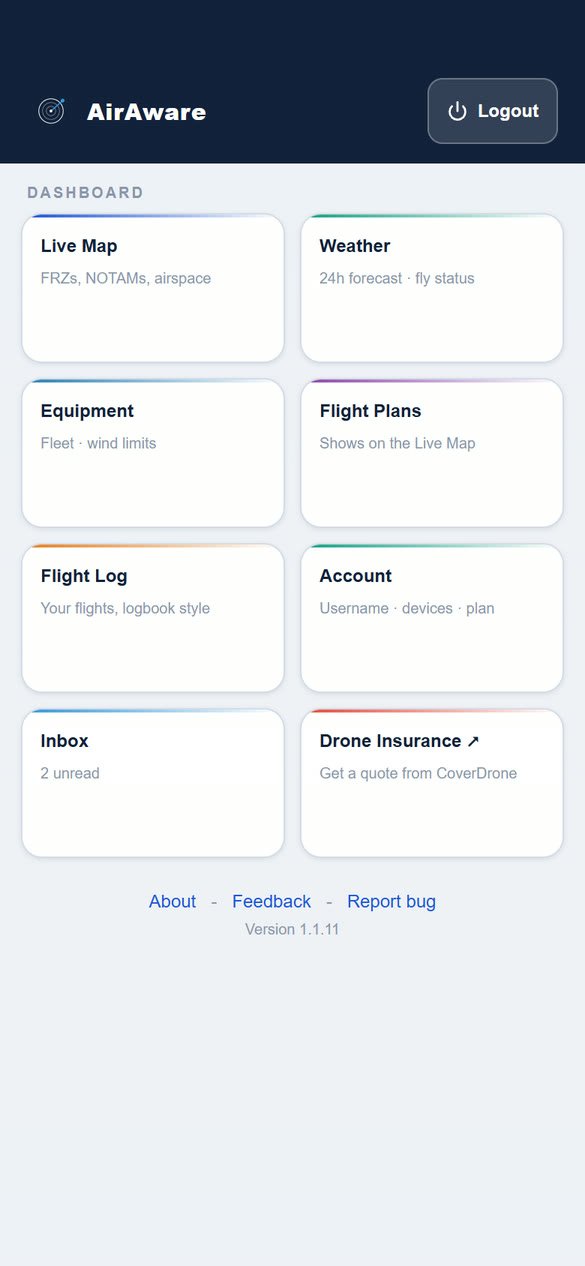
Home is where you start. Tap a tile to open that part of the app.
| Live Map | Airspace, NOTAMs and zones (Chapter 3) |
| Weather | 24-hour forecast and fly status (Chapter 5) |
| Equipment | Your drones, wind limits and class marks (Chapter 6) |
| Flight Plans | Plans that show on the Live Map, each with a risk assessment (Chapter 7) |
| Flight Log Pro | Your record of flights flown (Chapter 8). On the Free plan the tile is marked Pro |
| Account | Username, details, qualifications, plan and settings (Chapter 10) |
| Inbox | Message other pilots. A number shows how many messages are unread (Chapter 9) |
| Drone Insurance | Opens a quote page from CoverDrone in a new tab |
On the Free plan, a token counter sits above the tiles, for example "14 of 20 tokens left this month". Tokens pay for Fly Now checks, weather forecasts and flight plan risk assessments (Chapter 11). Pro accounts do not see it.
A message from the AirAware team, such as news of a new version, can appear as a coloured banner at the top of Home. Tap × to dismiss it. If an administrator has sent you a warning about your use of messaging, it shows as a pop-up over the screen you are on until you tap to acknowledge it.
At the bottom of the screen, About explains the app, Feedback lets you tell us what you think, and Report bug lets you report a problem. If you have Pro but no username yet, a banner reminds you to choose one on the Account page.
Accounts that run the service also have a small Admin button next to Logout. It is not covered here.
Chapter 3The Live Map
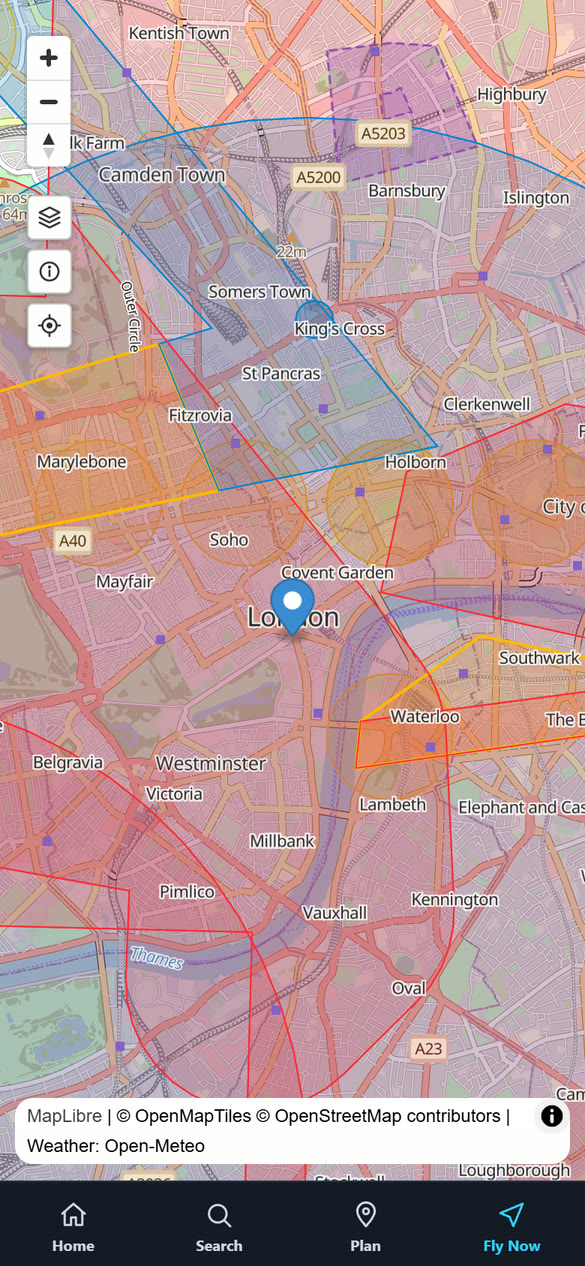
The map shows the airspace and ground features that matter to a drone pilot. Pinch or use the buttons to zoom, drag to move, and tap anywhere for details.
A tour of the screen
- Zoom buttons. + and − zoom in and out.
- Compass. Tap it to turn the map back so north is at the top.
- Layers. The stack icon opens the Layers panel, where you choose what the map shows (below).
- Information. The i icon shows when the airspace data was last updated (the AIRAC cycle and its validity period) and recent changes to danger areas.
- My location. The target icon moves the map to where you are.
- Your position. The blue pin marks where you are. If it does not appear, the app does not have permission to use your location (see Chapter 12).
- The bottom bar. Four buttons:
- Home back to the Home screen
- Search find a place
- Plan drop a pin on a spot
- Fly Now check the spot you are at
 1234567
Choosing what the map shows (Layers)
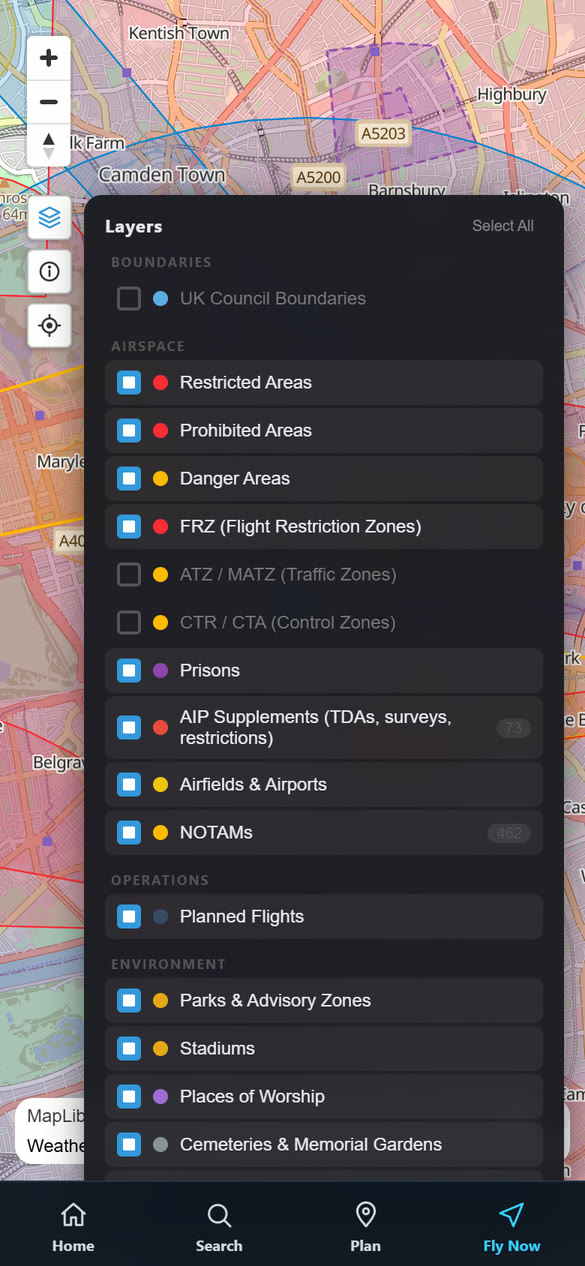
- Tap the Layers button (the stack icon on the left of the map).
- Tick or untick a layer to show or hide it. Select All turns everything on.
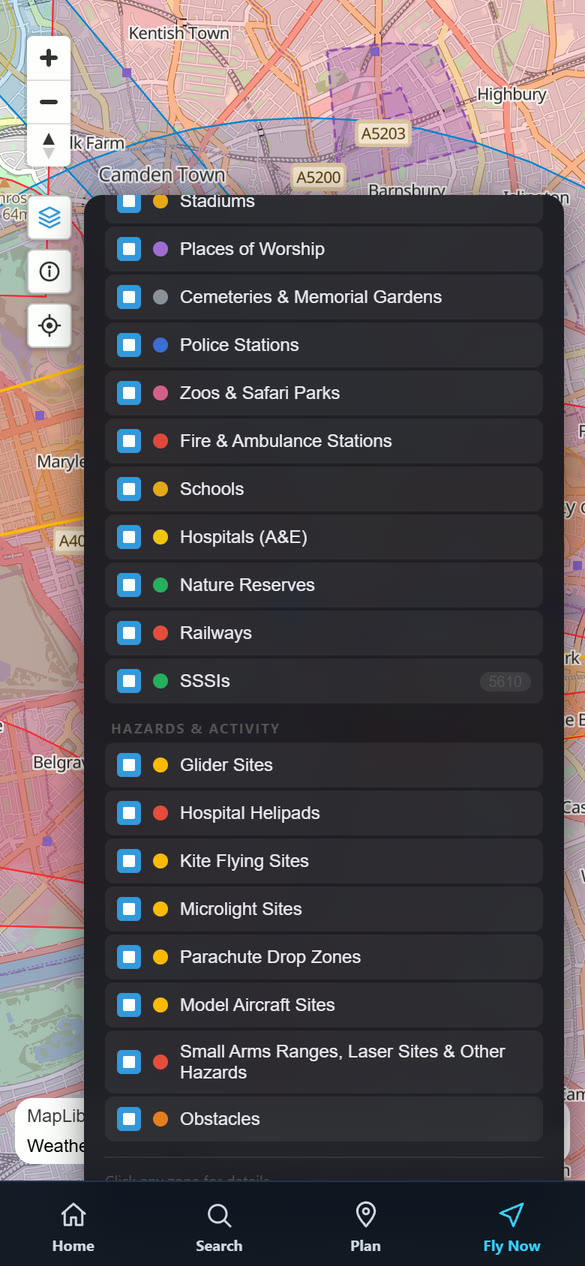
- Scroll the panel to see the rest. Tap the Layers button again to close it.
The layers are in five groups. The coloured dot beside each name is the colour used for it on the map. ATZ / MATZ and CTR / CTA start switched off, because they cover large areas and do not themselves restrict a drone; tick them if you want to see them. The counts beside AIP Supplements, NOTAMs and SSSIs show how many items are loaded.
| Boundaries | |
|---|---|
| UK Council Boundaries | Council areas and their drone rules (see below). Off until you switch it on |
| Airspace | |
| Restricted Areas | Areas where flying is restricted |
| Prohibited Areas | Areas where flying is not allowed |
| Danger Areas | Areas of hazardous activity, usually active only when a NOTAM says so |
| FRZ (Flight Restriction Zones) | The protected zones around aerodromes and airports, where drones may not fly without permission |
| ATZ / MATZ (Traffic Zones) | Traffic zones around airfields and military airfields. Off by default |
| CTR / CTA (Control Zones) | Controlled airspace around busy airports. Off by default |
| Prisons | Prison sites, where drones are not permitted nearby |
| AIP Supplements (TDAs, surveys, restrictions) | Temporary danger areas, surveys and restrictions published by the authorities |
| Airfields & Airports | Airfields, including small and disused ones |
| NOTAMs | Current and upcoming Notices to Air Missions, with a count |
| Operations | |
| Planned Flights | Flights other pilots (and you) have planned |
| Environment | |
| Parks & Advisory Zones | Parks and areas where people gather |
| Stadiums | |
| Places of Worship | |
| Cemeteries & Memorial Gardens | |
| Police Stations | |
| Zoos & Safari Parks | |
| Fire & Ambulance Stations | |
| Schools | Schools, colleges and universities |
| Hospitals (A&E) | |
| Nature Reserves | Protected wildlife sites |
| Railways | |
| SSSIs | Sites of Special Scientific Interest, protected for wildlife or geology |
| Hazards and Activity | |
| Glider Sites, Kite Flying Sites, Microlight Sites, Parachute Drop Zones, Model Aircraft Sites | Places where other aircraft activity is common |
| Hospital Helipads, Small Arms Ranges, Laser Sites & Other Hazards | |
| Obstacles | Masts, pylons, wind turbines, chimneys and similar. Shown when you are zoomed in |
Searching for a place
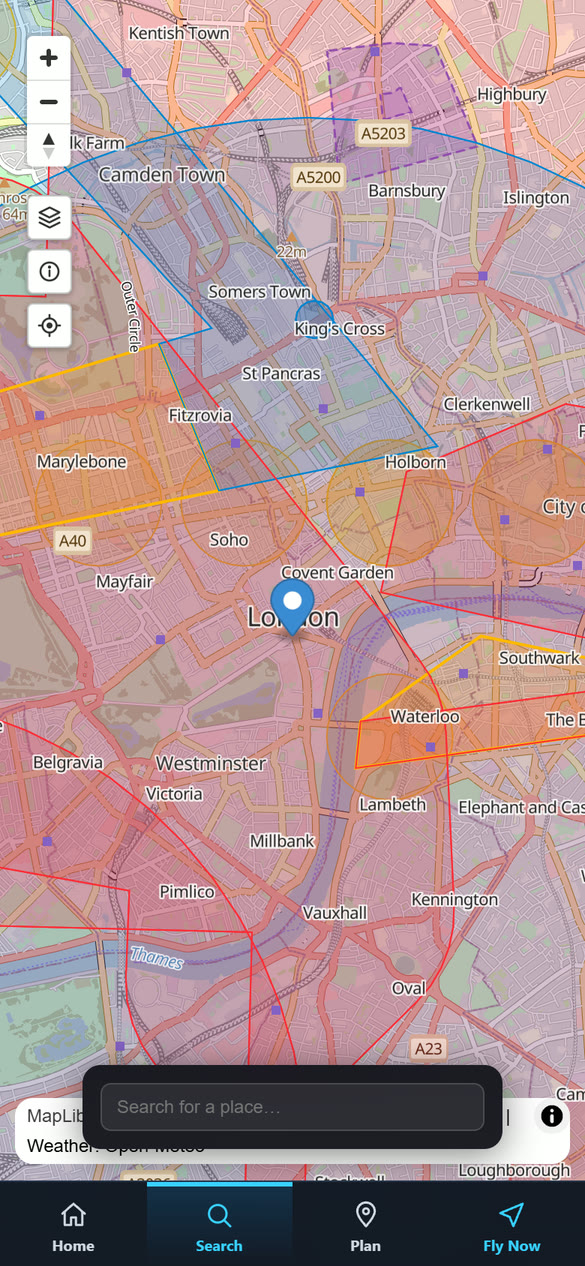
- Tap Search in the bottom bar.
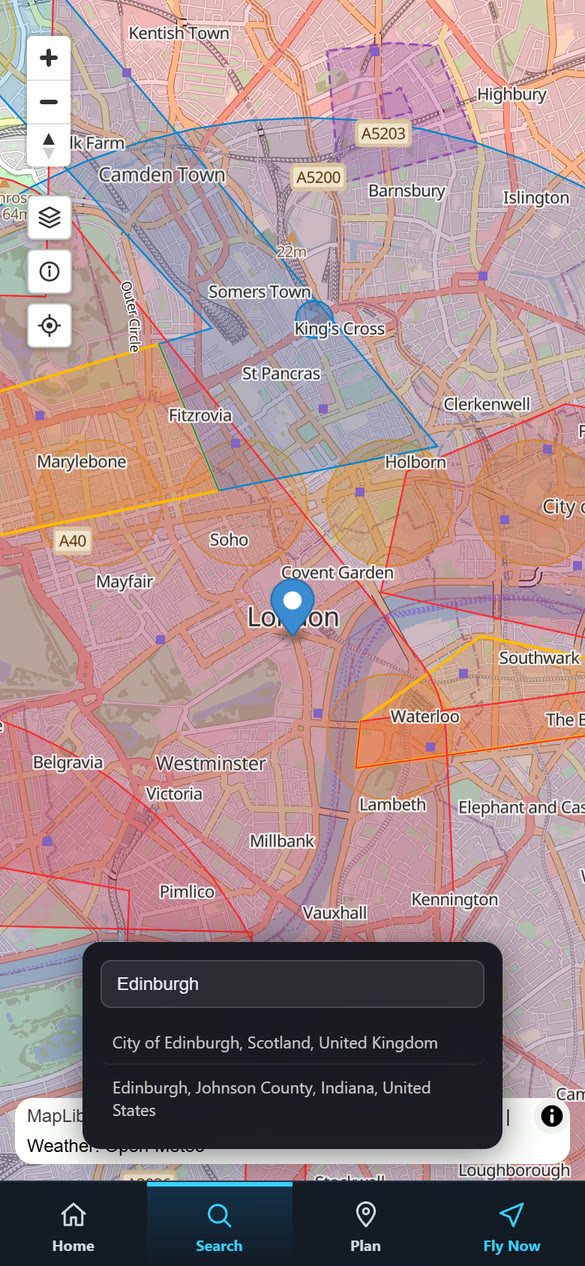
- Type a place name, town or address.
- Tap a result. The map moves to that place.
Place search uses the Geoapify service (with OpenStreetMap place data). Be specific for best results: the same name can exist in several countries, as the Edinburgh example shows.
Tapping the map for details
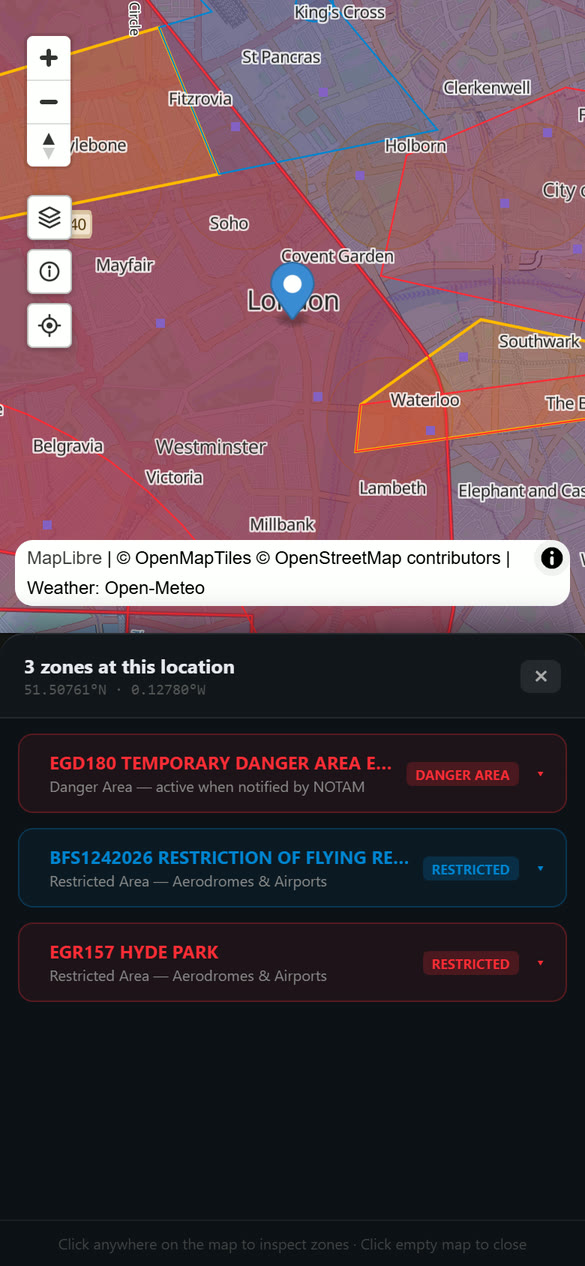
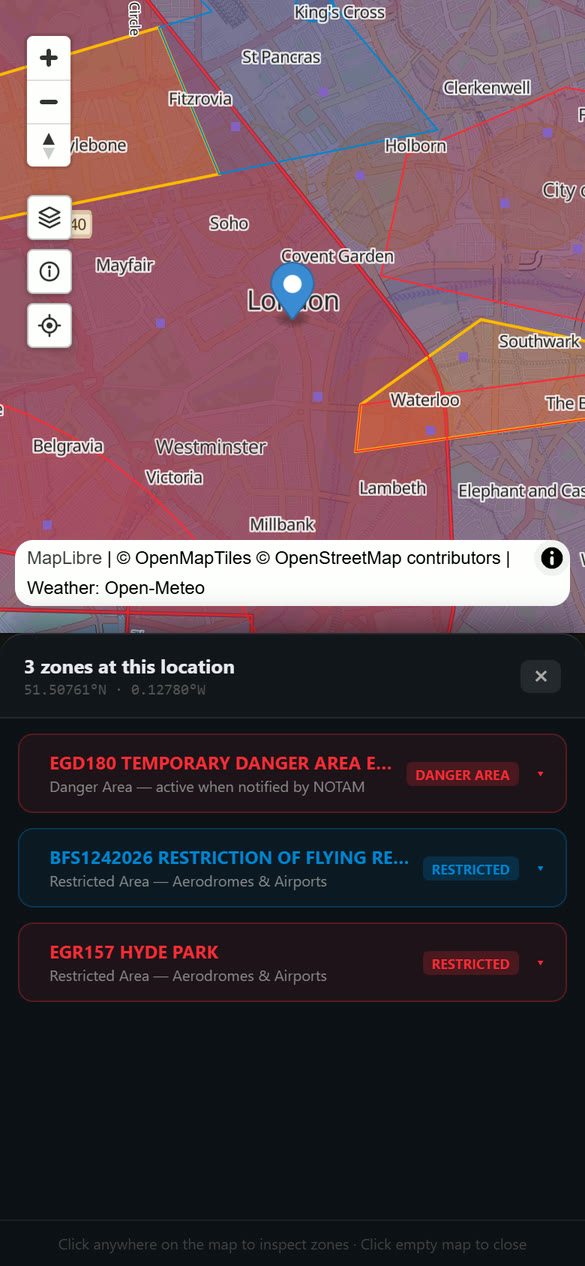
- Tap a spot on the map. A panel slides up listing every zone at that point, for example "4 zones at this location".
- Each zone has a coloured card with its name, what kind of zone it is and a short note, such as Control Zone: drone flight is not restricted by the CTR itself or Danger Area: active when notified by NOTAM.
- Tap a card to open it. You see the zone's name, upper limit, lower limit, hours and other details from the source.
- While a card is open, the map shows only that zone, plus the environment layers and obstacles, so you can see it clearly. A message says so. Close the card or tap × to bring everything back.
Council boundaries and drone byelaws
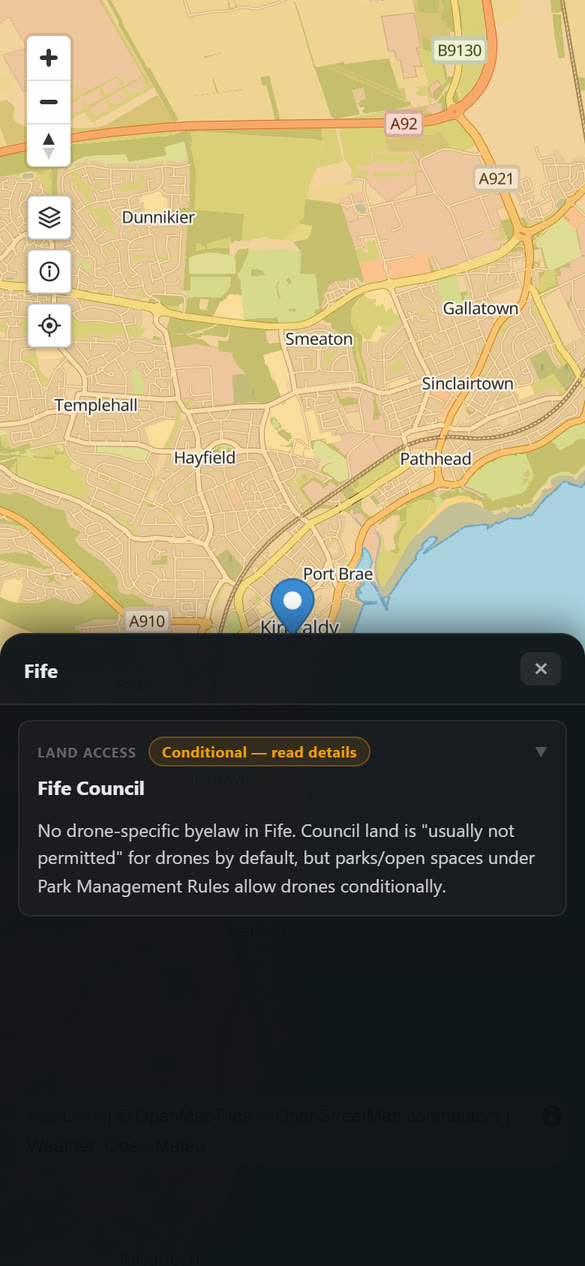
Councils can have their own rules about flying from or over council land, such as parks and beaches. The app shows a note for each council.
- Tap Layers, then switch on UK Council Boundaries. The other layers are dimmed so the councils stand out.
- Close the panel and tap inside a council area.
- A panel shows the council name and a Land access note with a status, such as Conditional, and a summary of its drone rules. Tap Read details where offered for the full wording and links to the council's own pages.
- Switch the layer off again in the Layers panel to return to the normal map.
| Status | Meaning |
|---|---|
| No specific restriction | No drone-specific rule found |
| Conditional | Allowed in some places or with permission |
| Restricted | Drone flying is restricted on council land |
| Provisional | The note is still being checked |
| Unresearched | No note yet. Check the council's website |
Dropping a pin to plan or check a spot
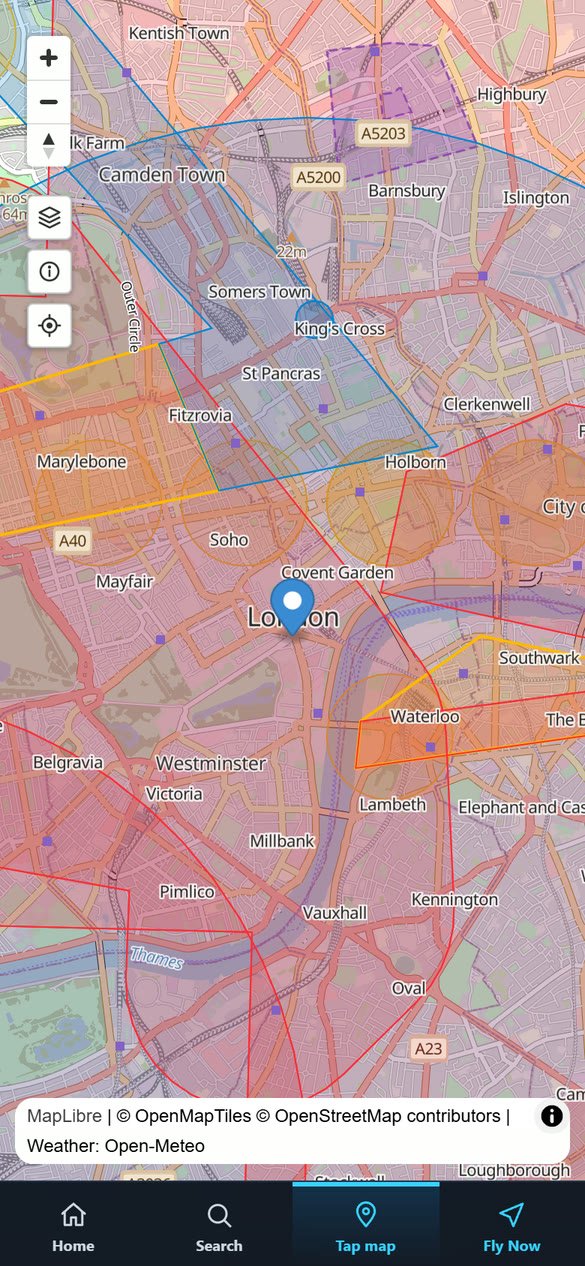
- Tap Plan. The button changes to Tap map.
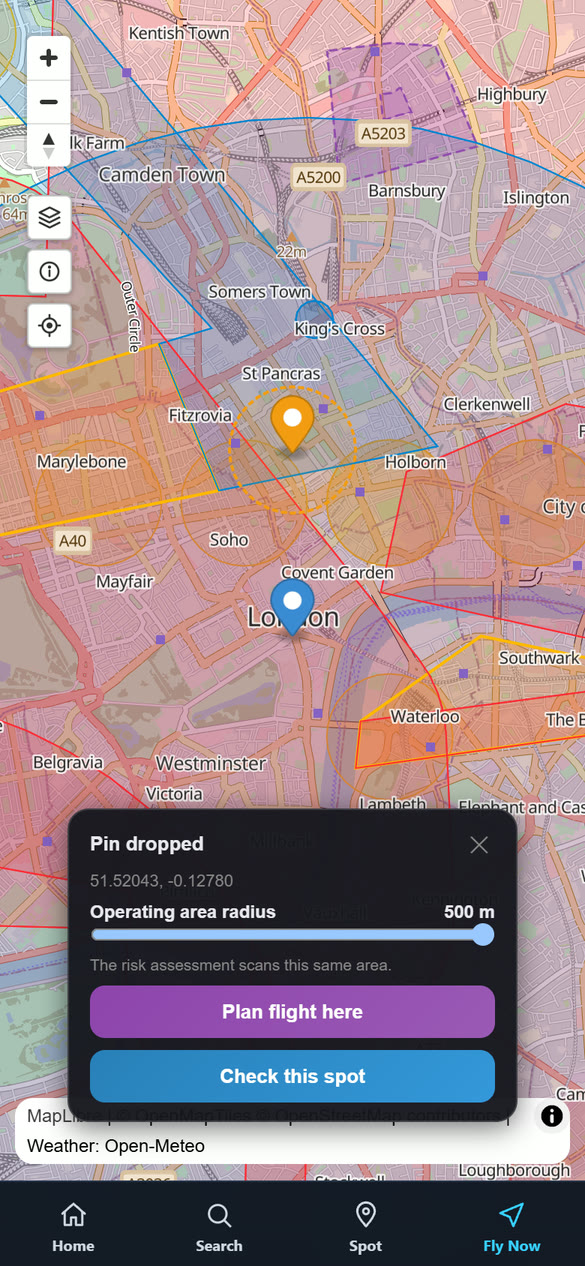
- Tap the spot where you want to fly. A pin appears (the button now says Spot) with a dotted circle round it, and a Pin dropped panel shows its coordinates.
- Drag the Operating area radius slider, from 50 m to 500 m, to set how big an area you will use. The circle on the map follows it. The risk assessment and Fly Now scan this same area.
- Choose what to do:
Tap the map again to move the pin, tap the pin to remove it, or tap the Plan button once more to cancel.
Other pilots' flight plans
Flights that pilots have planned appear as blue markers (a circle around the site showing the area the pilot plans to use). Tap one to see the date, time and altitude. If you have Pro and a username, the card has a Message button for the pilot. Switch these on or off with the Planned Flights layer.
Chapter 4Fly Now
Fly Now checks the place you are standing and tells you in seconds whether it looks clear, needs care or is not suitable. It then writes a brief you can read, and a site survey and risk assessment you can save.
What it checks
Airspace and NOTAMs are checked within 2 km of you, because they matter well beyond your own spot. Everything else is checked within 500 m.
| Check | What it looks at |
|---|---|
| Location | Your coordinates, the place name and the kind of area you are in (for example a public park). |
| Weather | Wind, gusts, rain, visibility and cloud right now. Fly Now uses fixed thresholds: CAUTION above 15 kts of wind, 25 kts of gusts or any real rain; FAIL above 25 kts of wind, 35 kts of gusts, heavy rain or thunderstorms. |
| Airspace | Restricted areas, danger areas, traffic zones, control zones and airfields near you, and whether you are inside one. |
| NOTAMs | Active NOTAMs near you, and ones starting soon. |
| Flight Plans | Flights other pilots have planned nearby. |
| Activity Sites | Gliding, parachuting, model flying, flares and similar activity sites near you. |
| Environment | Schools, parks, places of worship, hospitals, police and fire stations, nature reserves, railways, obstacles and council drone rules. |
| Daylight | Sunrise, sunset and whether you are in the dark or close to it. Flying at night needs an anti-collision light. |
| Open category | Whether your chosen drone can fly here under the UK Open category rules (A1, A2 or A3), using the distances to people, buildings and built-up or recreational areas around you (see below). |
Running a scan
- Tap Fly Now in the map's bottom bar.
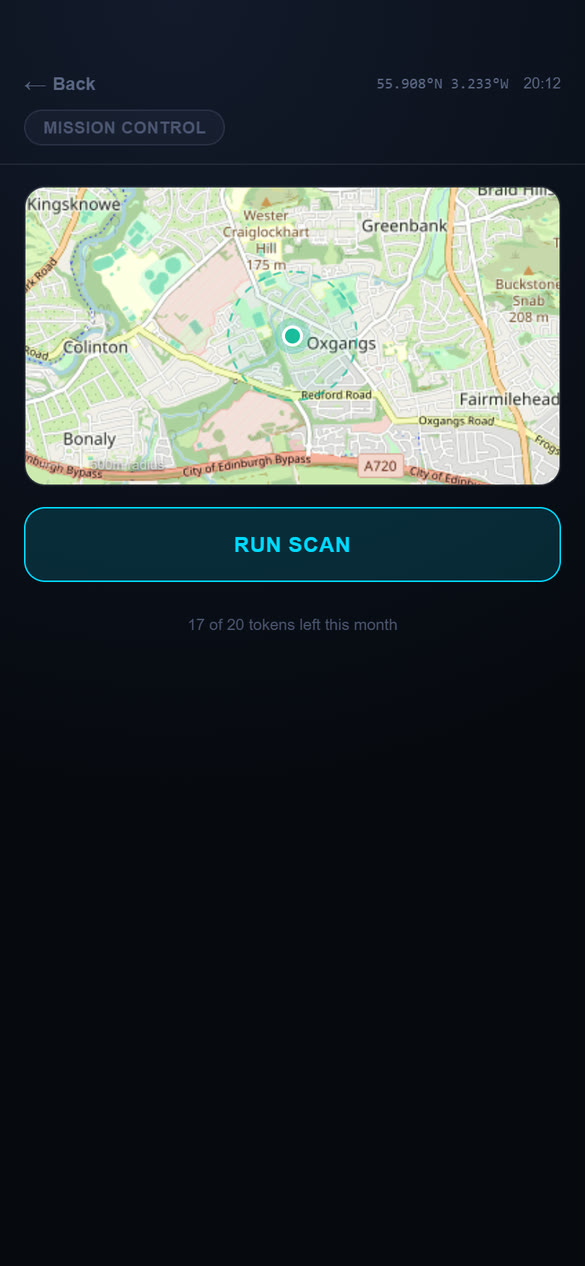
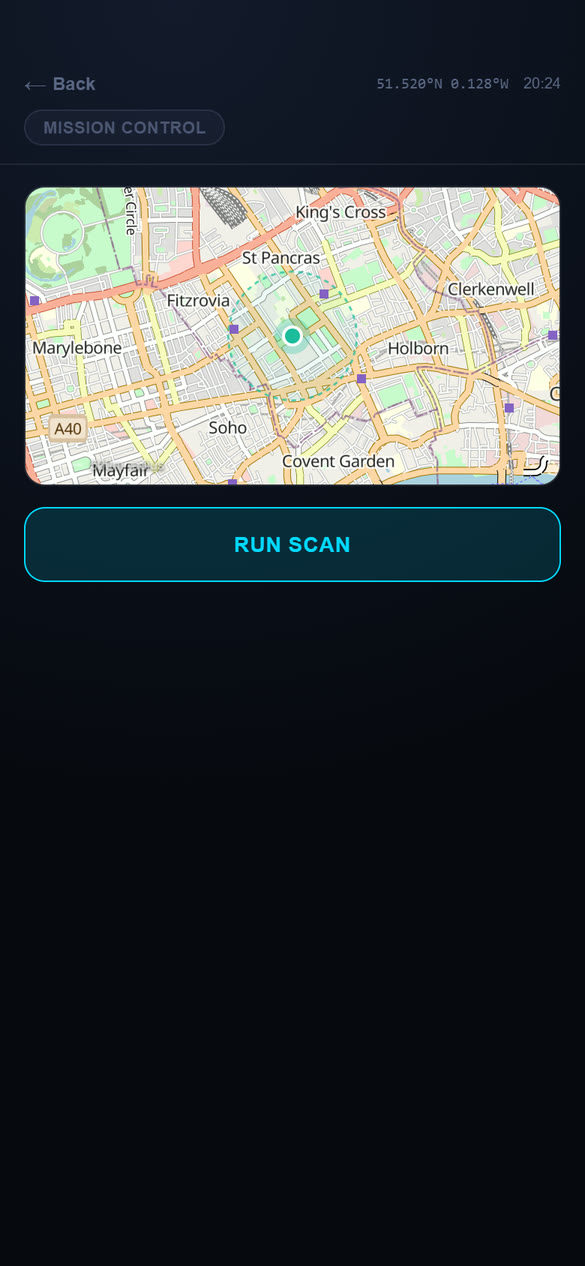
- Allow the app to use your location if it asks. The small map shows where you are and the 500 m circle that will be checked.
- Tap RUN SCAN. The cards fill in one by one.
- When it finishes, the top of the screen shows the overall result and the cards show the detail.
A token is only spent once your position has been found, so a location problem costs nothing. Scanning the same spot again within 5 minutes (about 200 m) is free.
To check somewhere other than where you are, drop a pin on the map and choose Check this spot (Chapter 3). The result is then labelled Planned location, not your GPS.
Reading the results
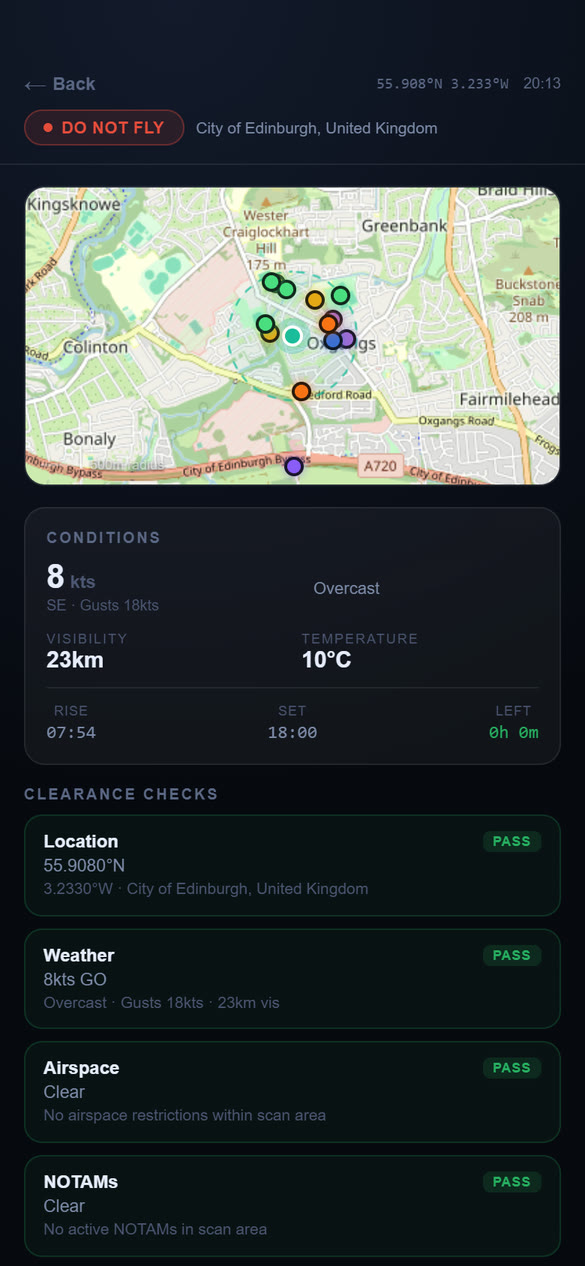
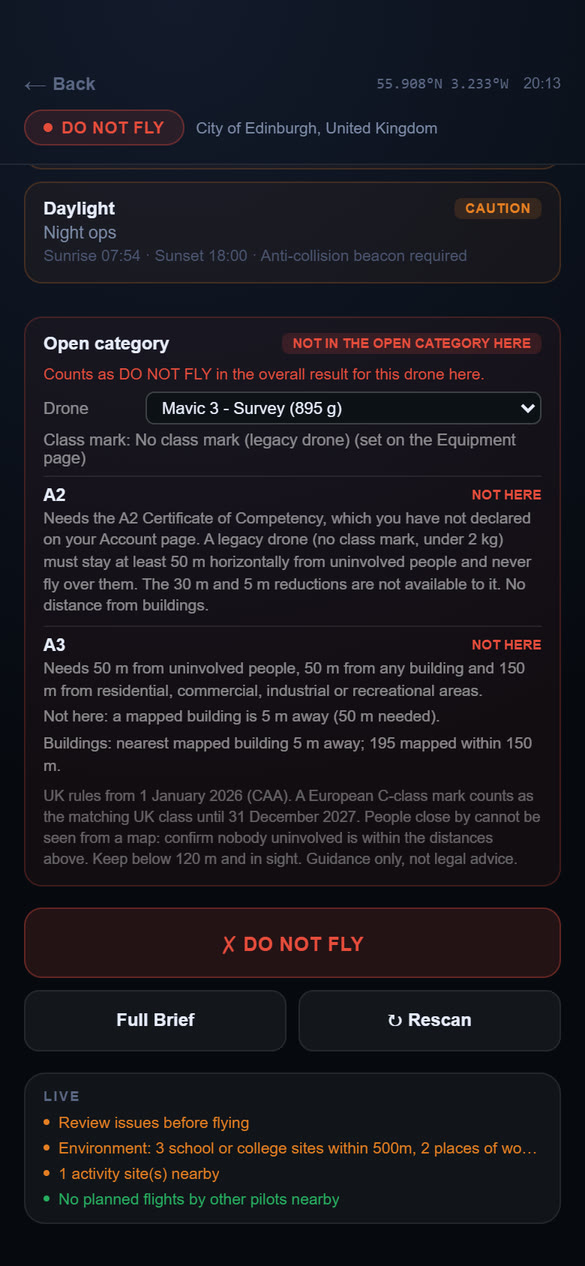
Every card carries a status:
| PASS | Nothing found that needs attention. |
| CAUTION | Something to review before you fly, for example gusty wind, a school nearby or flying after dark. |
| FAIL | A serious problem, for example you are inside restricted airspace. |
The overall result sums these up:
| CLEARED TO FLY | Nothing of concern found. |
| CAUTION – REVIEW | Review the cautions before you fly. |
| DO NOT FLY | One or more serious problems were found. |
The small map shows coloured dots for the things that were found around you (airspace, NOTAMs, airfields, activity sites, schools, obstacles and so on). Tap Rescan to run the check again, for example after you move.
The Open category check
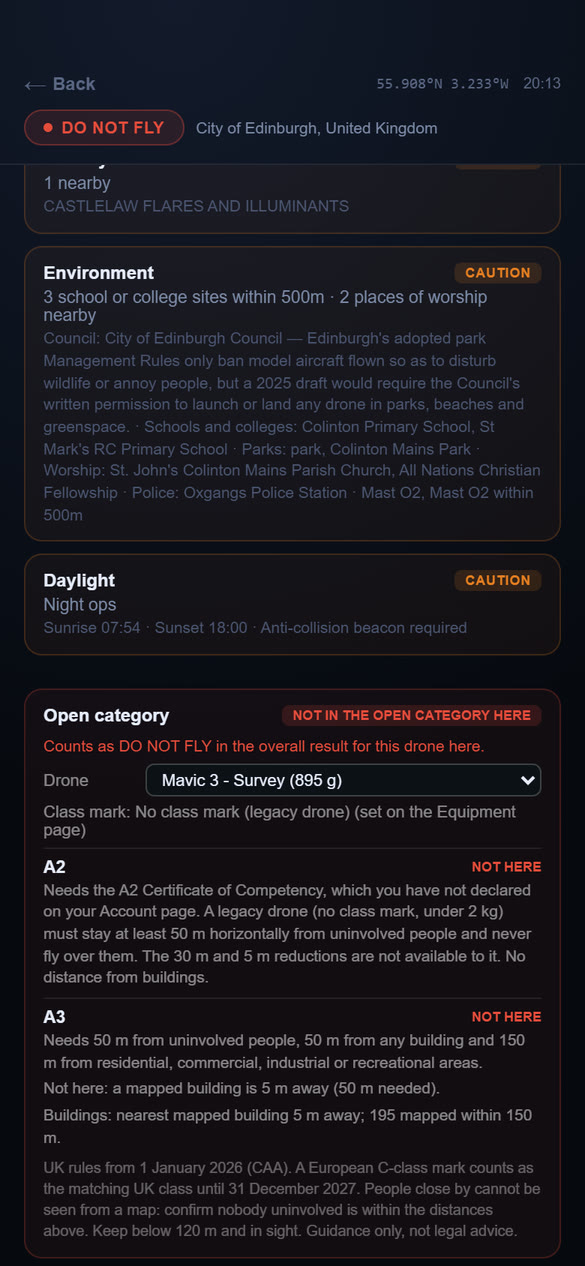
Below the other cards, the Open category card judges the spot you scanned against the CAA's Open category rules (in force from 1 January 2026) for one of your drones. It uses the distances to buildings and other places that the scan has already measured.
- Choose the drone on the card. It starts on your active drone. Changing the drone, or its class mark, recalculates the card straight away. It does not rescan and does not use a token.
- The card shows, for each subcategory, POSSIBLE HERE, CHECK CONDITIONS or NOT HERE, and says why.
| Subcategory | What it needs |
|---|---|
| A1 | A UK0 or UK1 drone, or an older drone under 250 g. Fly over open ground, never over crowds. |
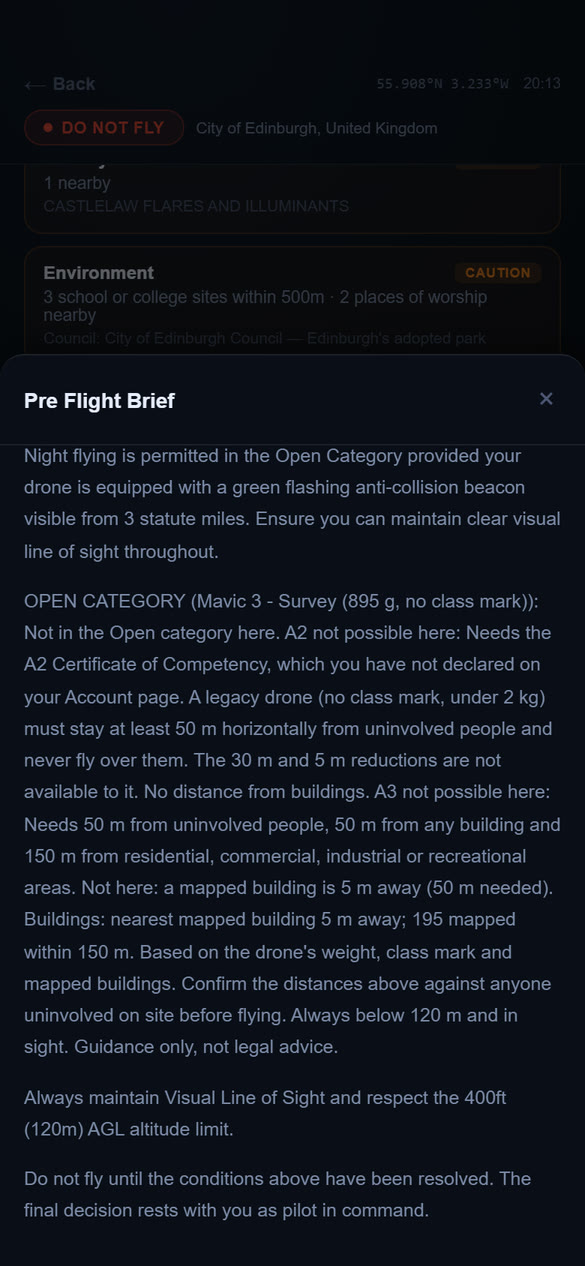
| A2 | A UK2 drone (or an older drone under 2 kg) and your A2 Certificate of Competency. Never over people; keep at least 30 m from people (5 m only in a low-speed mode for UK2). |
| A3 | A UK2, UK3 or UK4 drone, or an older drone under 25 kg. Keep at least 50 m from people and from any building, and 150 m from residential, commercial, industrial and recreational areas. |
| Specific | UK5 and UK6 drones, and drones of 25 kg and over, need an operational authorisation rather than the Open category. |
For this to work well, add your drones' class marks on the Equipment page (Chapter 6) and, if you hold it, your A2 Certificate of Competency under Qualifications on the Account page (Chapter 10).
The card also feeds the overall result at the top. If the Open category check says NOT HERE for the drone you chose, the overall result becomes DO NOT FLY; a caution on the card makes it at least CAUTION – REVIEW. Pick another drone and the overall result updates.
The Full Brief
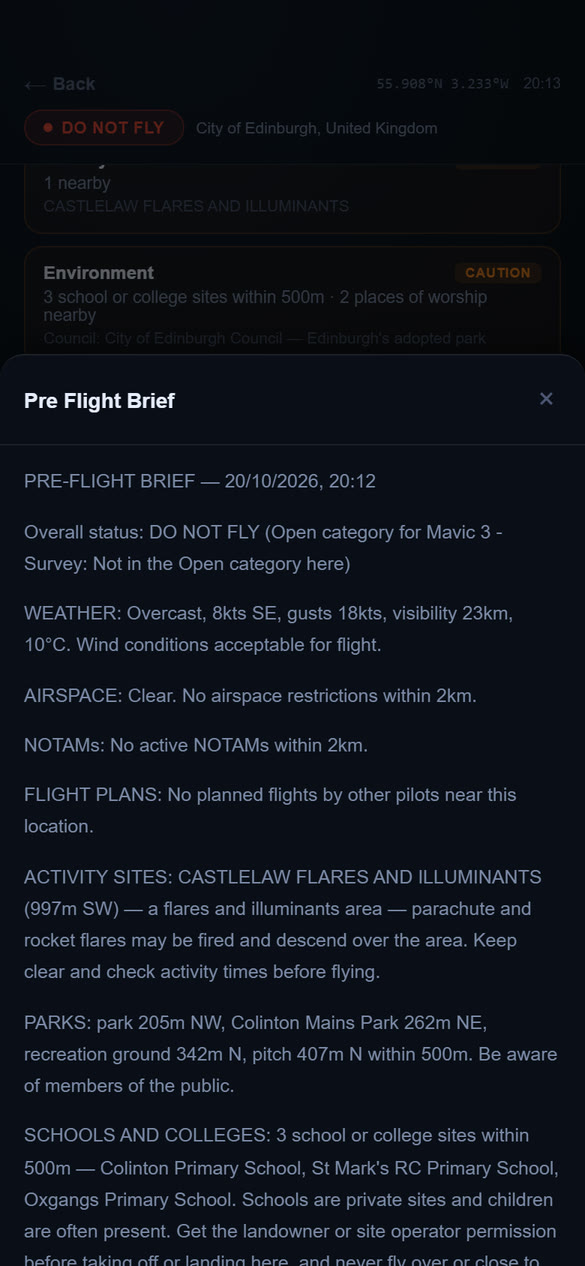
Tap Full Brief for a written pre-flight brief of everything in the scan. It repeats each check in plain English, for example: "AIRSPACE – CAUTION: 1 airspace zone within 2 km, though your position is currently outside them." It lists NOTAMs with their dates, activity sites with advice, byelaws with links to the council's pages, daylight and Kp (space weather) advice, and an Open category paragraph for your chosen drone.
Scroll the brief with your finger. Close it with ×.
Site survey and risk assessment
The site survey and risk assessment is no longer a button in the brief. It now belongs to each flight plan, so it is built for the exact site and area you plan to fly, can be completed on site and signed, and is saved with the plan. See Risk assessment for a plan in Chapter 7.
When your free checks run out
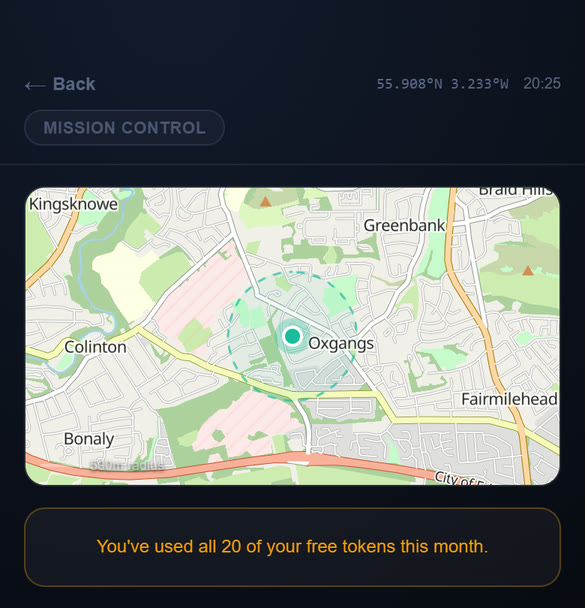
On the Free plan, once you have used all 20 tokens for the month, RUN SCAN shows: "You've used all 20 of your free tokens this month." The counter resets at the start of each calendar month. To carry on now, upgrade to Pro (Chapter 11).
The map and all its layers still work as normal.
Chapter 5Weather
A flying forecast for any place, judged against your own drone's limits.
Getting a forecast
- Open Weather from the Home screen.
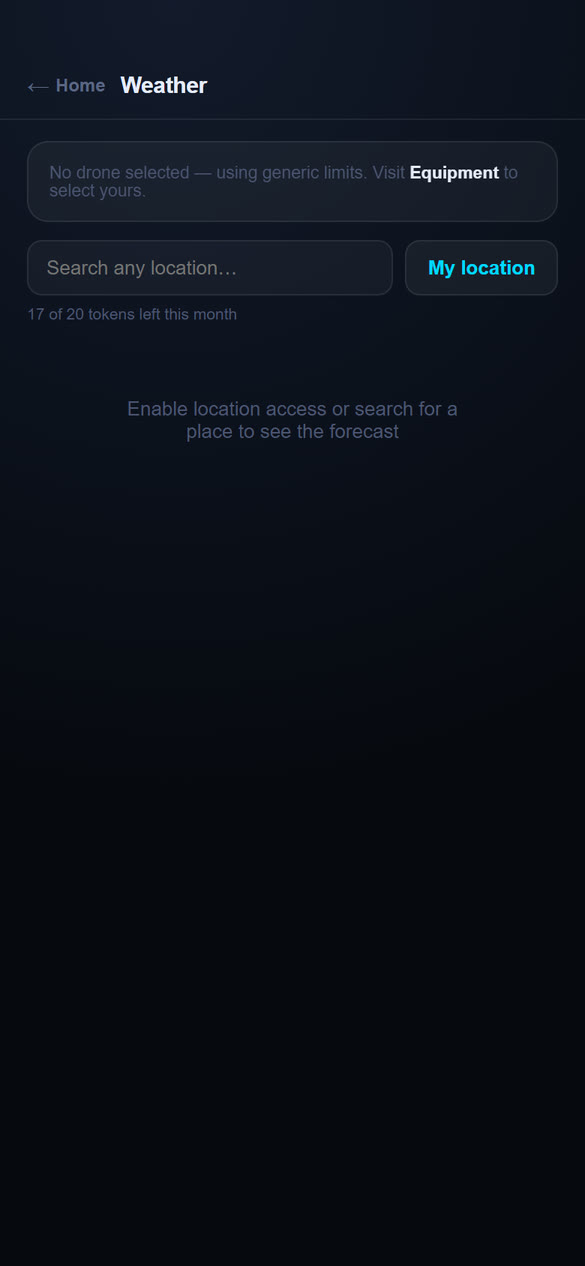
- Tap My location for where you are, or type a place in the search box and pick a result.
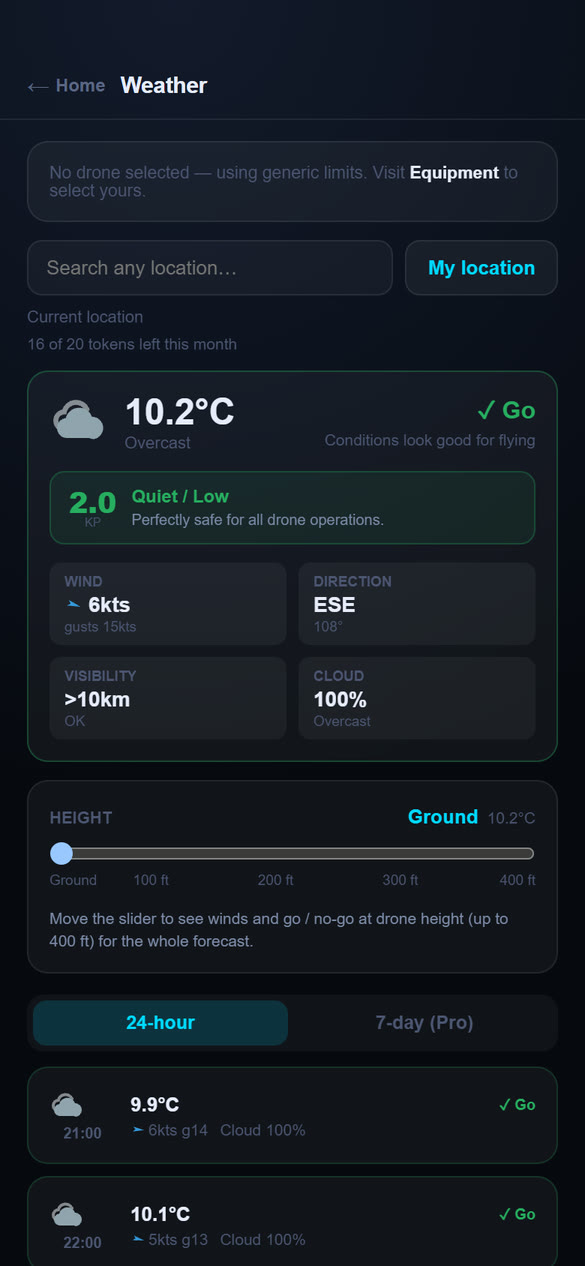
- The forecast appears. At the top is the current condition and a verdict: Good to fly, Caution or No-go.
My location shows "Finding your location..." while it works, and tells you what to check if your position cannot be found.
What the forecast card shows
- Temperature, conditions and verdict. The note under the verdict explains it, for example gusts approaching your aircraft's limit.
- Kp (space weather). The solar activity index from 0 to 9. A low number is safe. Higher numbers can disturb GPS and the compass: at Kp 4 keep an eye on satellite counts, at Kp 5 avoid automated flight, and at Kp 6 or more do not fly.
- Wind and direction, visibility and cloud.
Wind at flying height
Wind is usually stronger higher up. The Wind height slider lets you see the forecast for the height you intend to fly, from Ground up to about 400 ft. Move the slider and the verdicts for the whole forecast update for that height.
Hour by hour
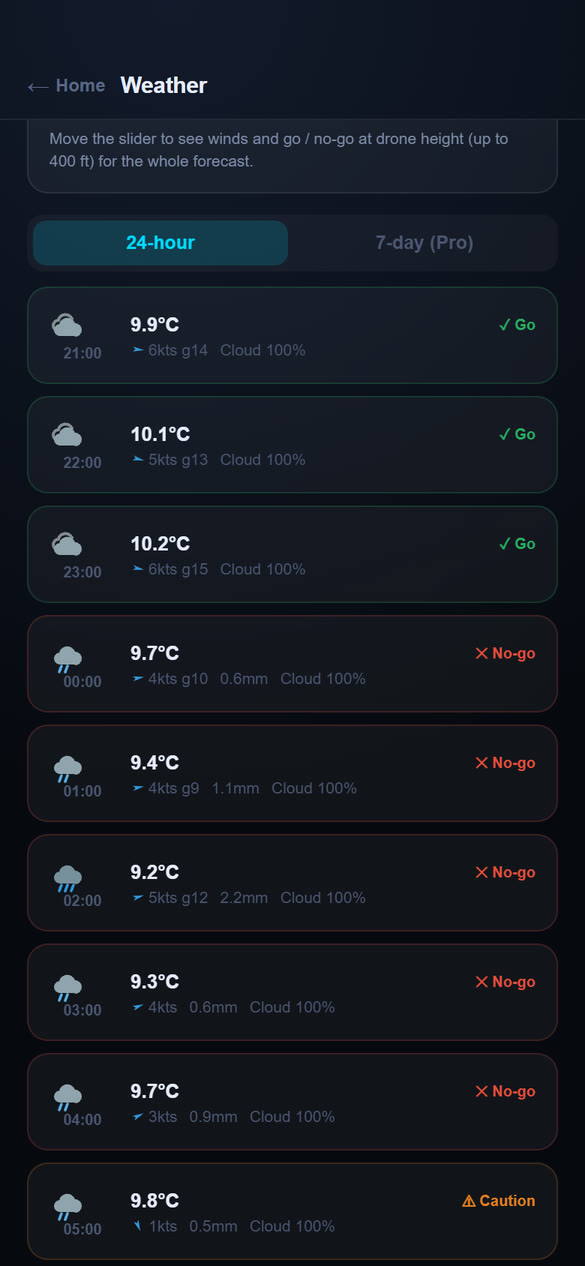
Below the slider, the 24-hour and 7-day tabs list the forecast. Each row shows the time, temperature, wind and gusts (for example 13kts g27), cloud cover and a verdict, so you can find the best window to fly. The 24-hour list is on every plan; the 7-day tab is a Pro feature.
Your units
Wind can be shown in knots or metres per second, and heights in feet or metres. Choose them under Settings on the Account page (Chapter 10). Your saved wind limits are not changed, only how they are shown.
Weather data comes from Open-Meteo and place names from Geoapify and OpenStreetMap. Kp comes from GFZ Potsdam.
Chapter 6Equipment
Keep a list of your drones. The wind and gust limits you save here are used to judge the weather for each aircraft.
Adding a drone
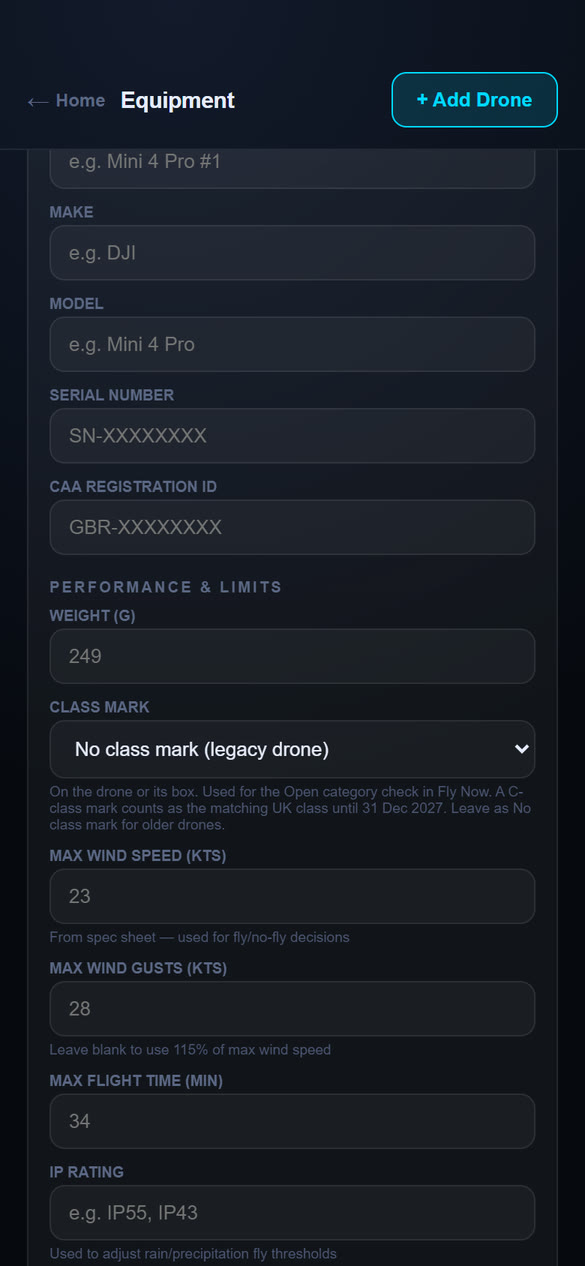
- Open Equipment from the Home screen and tap + Add Drone.
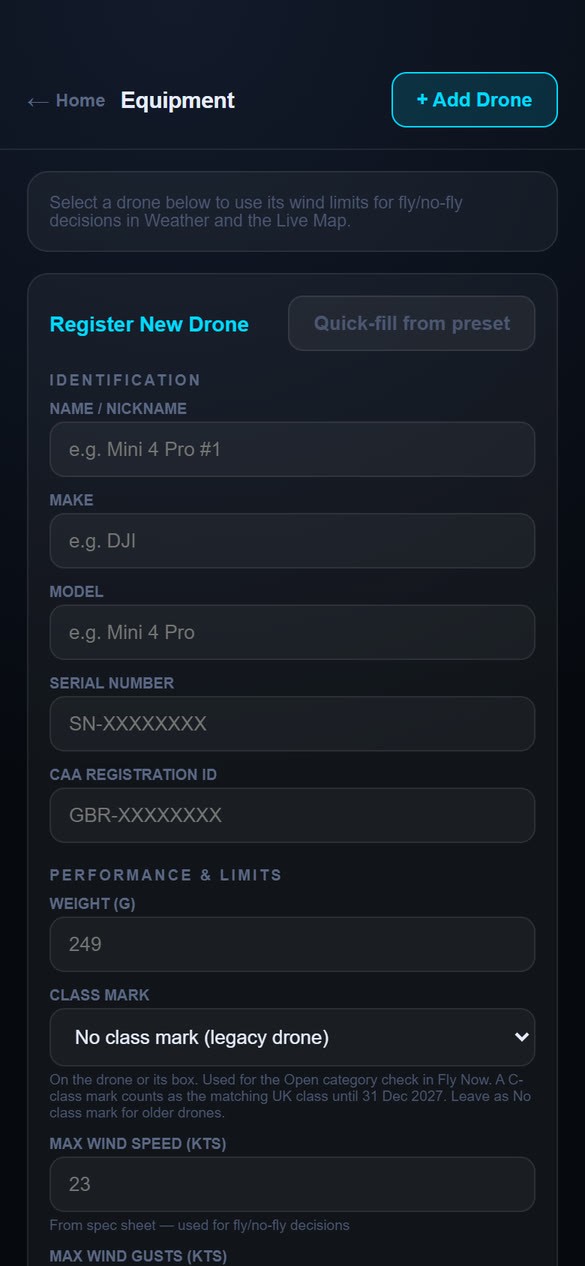
- To save time, tap Quick-fill from preset and pick your model. Name, make, weight, wind limits and flight time fill in for you.
- Check or complete the fields (below), then save.
| Fields | |
|---|---|
| Identification | Name or nickname, make, model, serial number and CAA registration ID. |
| Performance and limits | Weight (g), max wind speed (kts), max wind gusts (kts), max flight time (min) and IP rating. Wind limits come from the manufacturer's spec sheet. Leave the gust limit blank to use 115% of the wind limit. An IP rating (for example IP55) lets the app allow for light rain. |
| Class mark | The UK class mark printed on the drone or its box (UK0 to UK6, or a C0 to C6 mark, which counts as the matching UK class until 31 December 2027). Leave it as No class mark for older drones, which are judged by their weight. Fly Now's Open category check uses it (Chapter 4). |
| Camera and battery | Camera description and number of batteries. |
| Maintenance | Last maintenance and next service due. A drone shows Service due when its next service date is within 30 days. |
Choosing your active drone
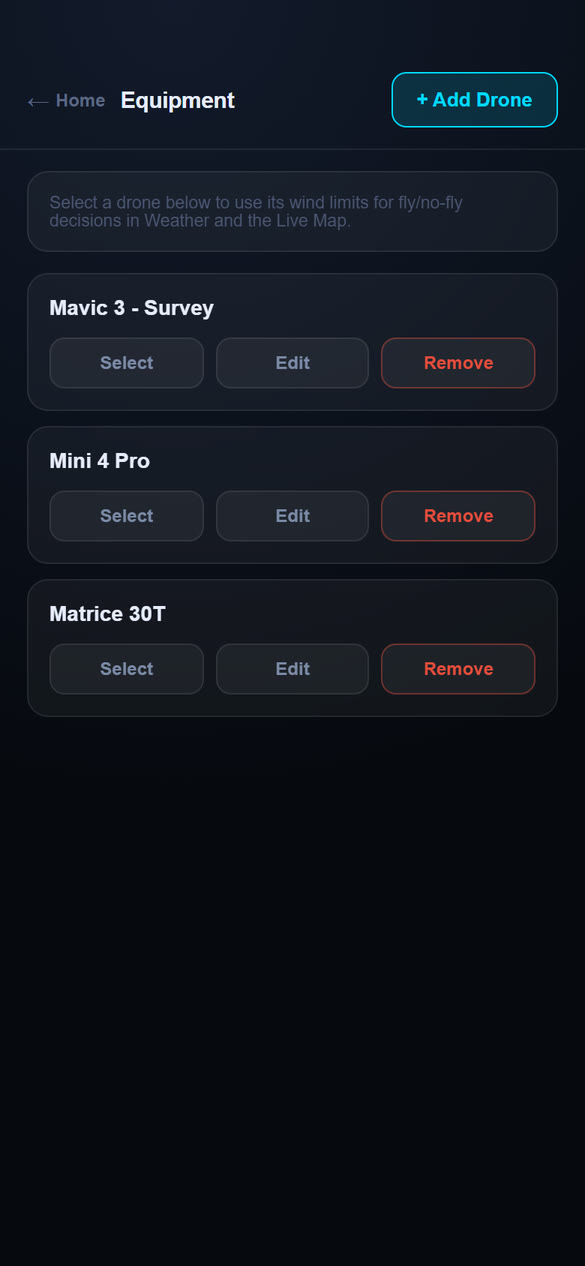
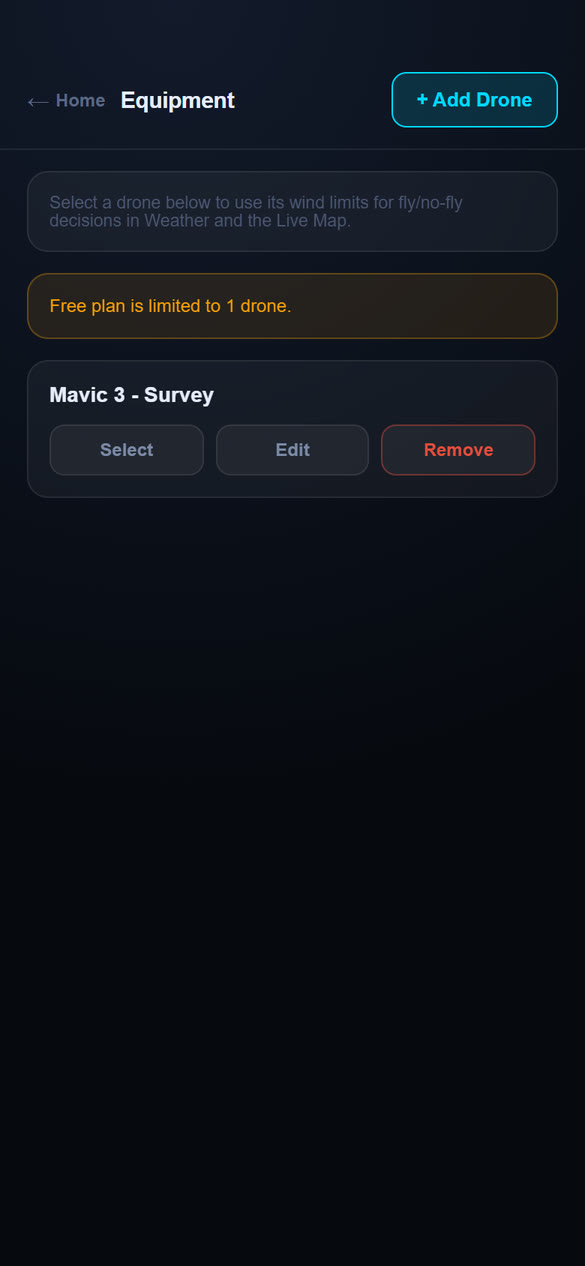
The active drone is the one the app uses for weather decisions. Tap Select on a drone to make it active (it then shows Active), or Deselect in the green banner to clear it. Each drone card also has Edit and Remove. Its status line shows OK once wind limits are set.
Chapter 7Flight Plans
Tell other pilots where and when you will be flying, and prepare the paperwork for the flight. Each plan shows on the Live Map as a blue Planned flight marker while it is current, so nearby pilots can avoid clashes or message you. Each plan also has its own site survey and risk assessment that you can complete on site, sign and save as a PDF.
Creating a plan
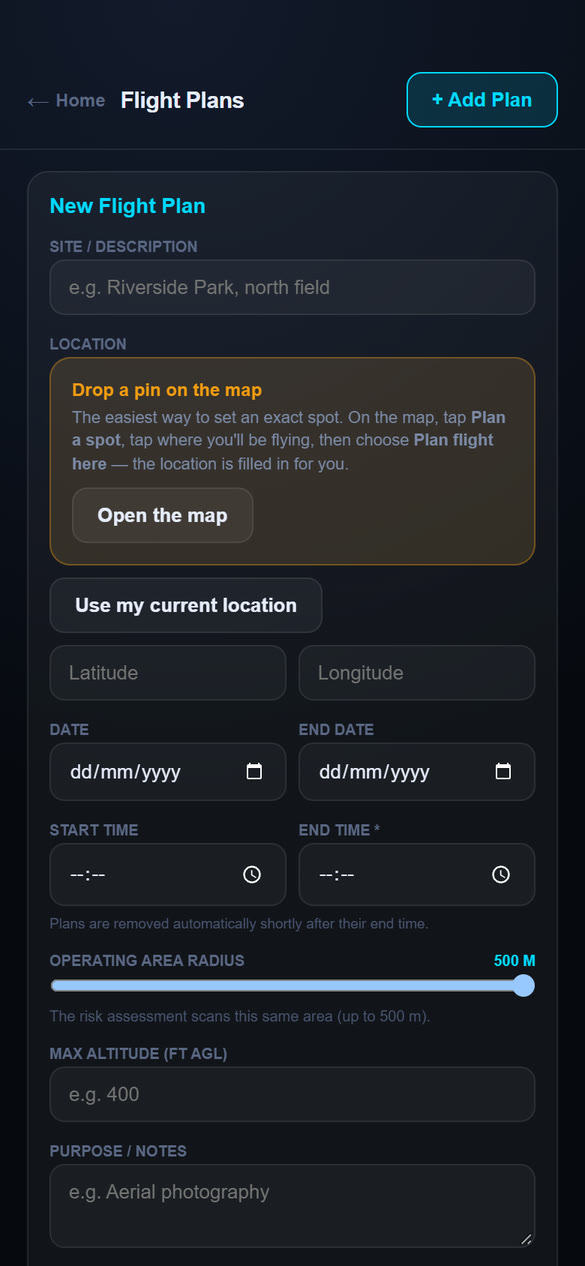
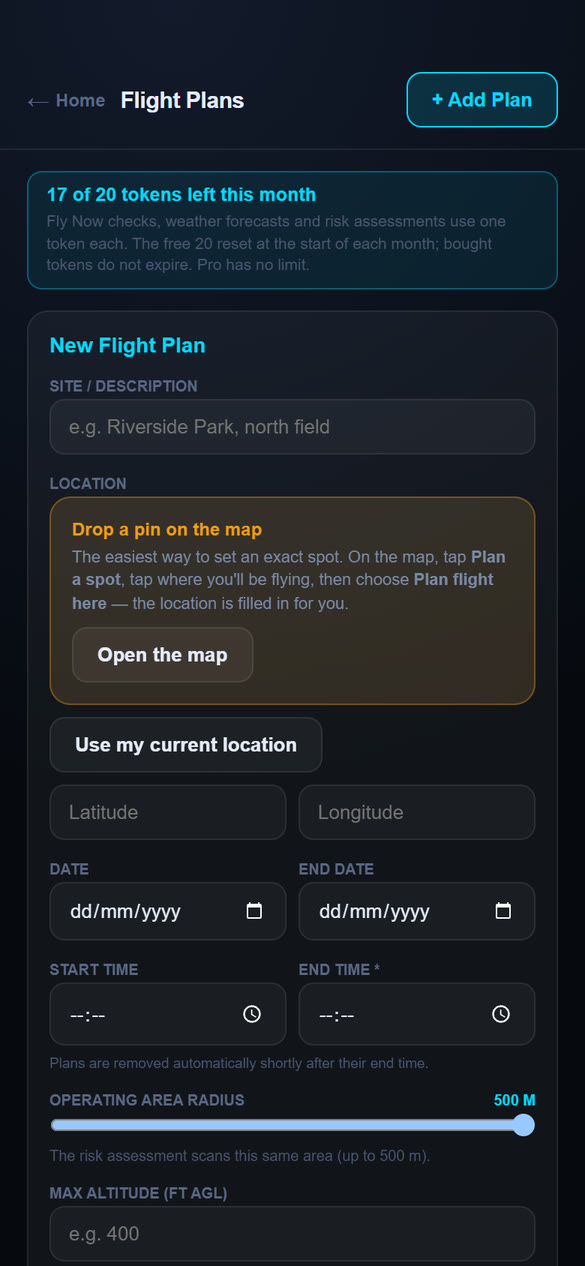
- Open Flight Plans and tap + Add Plan.
- Give the plan a site or description, such as "Riverside Park, north field".
- Set the location. The easiest way is to drop a pin: tap Open the map (or use Plan on the map, Chapter 3), tap where you will fly, then choose Plan flight here. You can also use Use my current location, or type a latitude and longitude.
- Enter the date (and an end date if it runs over several days) and the start and end times. The end time is required, because a plan is taken off the map after it ends.
- Set the operating area radius with the slider, from 50 m to 500 m. This is the area around your site that the risk assessment checks.
- Add your maximum altitude above ground (in feet or metres, whichever you chose in Settings) and any notes, such as the purpose.
- Tap Save Plan.
Your plan appears in your list and on the map. On the map its marker reads Upcoming until the plan's start time, then Active while it is in progress. When the plan ends it leaves the map straight away.
The plan tile
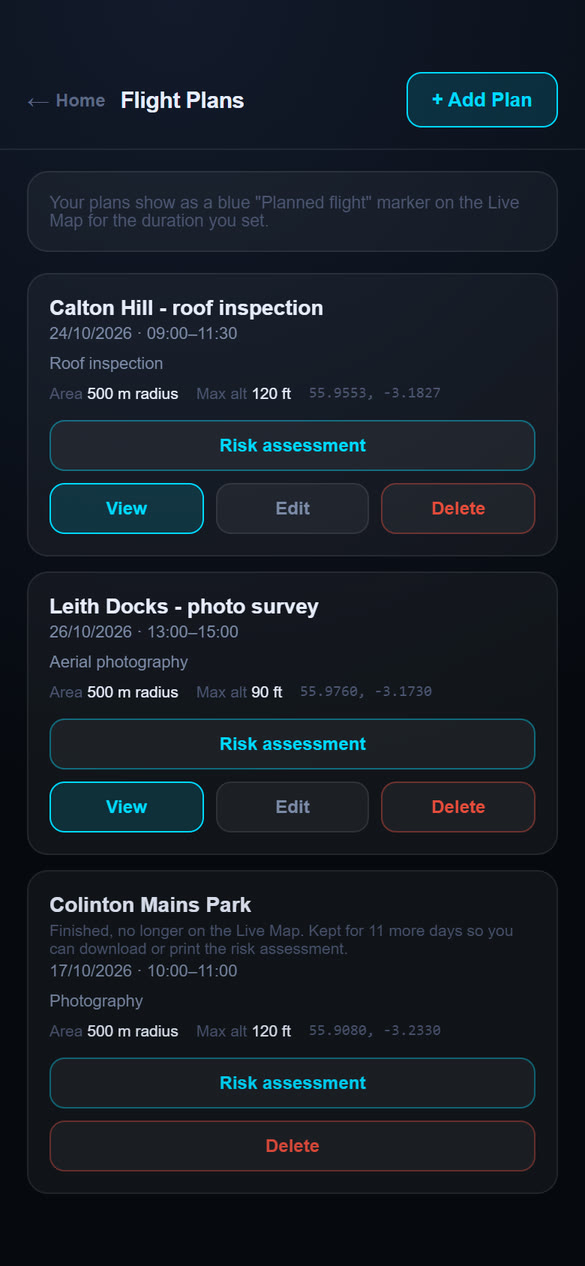
Each plan in your list shows the site, dates and times, purpose, operating area, maximum altitude and coordinates, with four buttons:
- Risk assessment opens the site survey and risk assessment for the plan (below).
- View opens the Live Map at the plan's site.
- Edit changes the plan. Moving the site or changing the area removes the saved risk assessment, because it no longer matches, so the next one is a fresh scan.
- Delete removes the plan, its risk assessment and its marker from the Live Map.
Finished plans
When a plan ends it disappears from the map, but its tile stays in your list for 14 more days, marked "Finished, no longer on the Live Map", with a count of how many days are left. That gives you time to download or print the risk assessment after the flight. A finished plan keeps its Risk assessment and Delete buttons; View and Edit are hidden. After the 14 days the plan and its assessment are deleted automatically. Finished plans sit below the current ones in the list.
Your flight log (Chapter 8) is separate and is kept until you delete an entry, so record the flight there if you want a permanent record.
Risk assessment for a plan
Press Risk assessment on a plan's tile. The app scans the plan's operating area, using the same checks as Fly Now (airspace, NOTAMs, weather, and the places and hazards around the site), and builds a report for you. It takes a few seconds. The report is shown in a preview first, so nothing is saved to your phone until you choose.
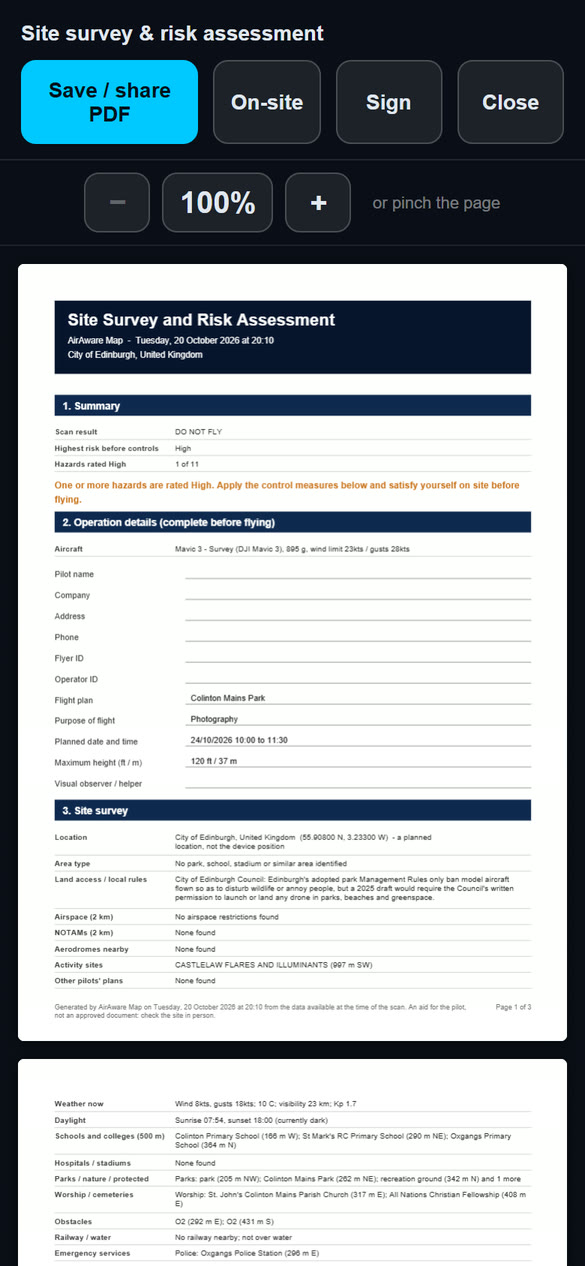
- Press Risk assessment. When the scan finishes, the preview opens, showing every page. Zoom with the + and − buttons or by pinching the page.
- Tap On-site to tick the on-site checks and add notes (below).
- Tap Sign to sign the report (below).
- Tap Save / share PDF to keep it. On a phone this opens the share sheet, so you can save it to Files or send it. On a computer it downloads.
- Tap Close to leave. Everything you added is saved with the plan.
What is in the report
- 1. Summary: the scan result and the highest risk found.
- 2. Operation details: your aircraft (from Equipment), your name, company, Flyer ID and Operator ID (from your Account), and the plan's date, times, height and purpose.
- 3. Site survey: location, area type, council rules, airspace, NOTAMs, activity sites, weather, daylight, and the schools, hospitals, places of worship, obstacles, railways and emergency services nearby.
- 4. Risk assessment: one row per hazard with what was found, the risk before controls (Low, Medium or High), suggested control measures and the risk afterwards.
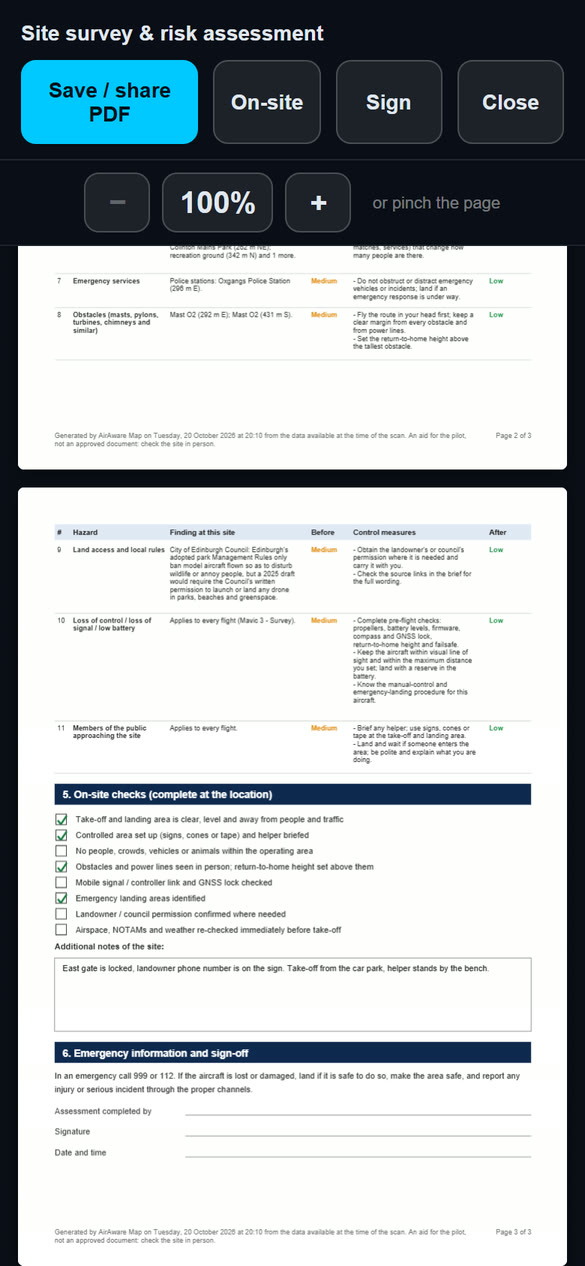
- 5. On-site checks: the tick-list and your additional notes.
- 6. Emergency information and sign-off: the emergency numbers, and your name, signature and the date and time.
On-site checks and notes
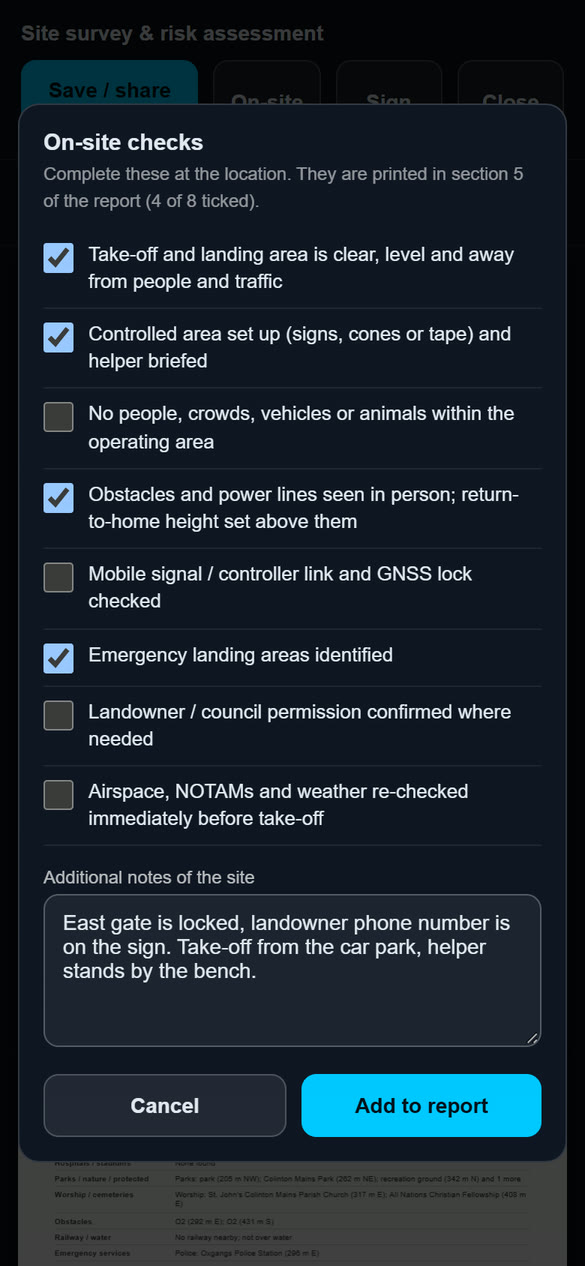
Complete this part at the location, just before you fly. Tap On-site in the preview. A panel lists eight checks, with a counter such as "4 of 8 ticked", and a box for additional notes of the site (up to 1,500 characters), for example the access route, a landowner's contact or where the helper will stand. Tap Add to report and the report is rebuilt with your ticks and notes in section 5.
| The eight checks |
|---|
| Take-off and landing area is clear, level and away from people and traffic |
| Controlled area set up (signs, cones or tape) and helper briefed |
| No people, crowds, vehicles or animals within the operating area |
| Obstacles and power lines seen in person; return-to-home height set above them |
| Mobile signal / controller link and GNSS lock checked |
| Emergency landing areas identified |
| Landowner / council permission confirmed where needed |
| Airspace, NOTAMs and weather re-checked immediately before take-off |
You can open the panel again at any time to change your ticks and notes. They print as a tick in each box, so a printed copy can still be completed with a pen if you prefer.
Signing the report
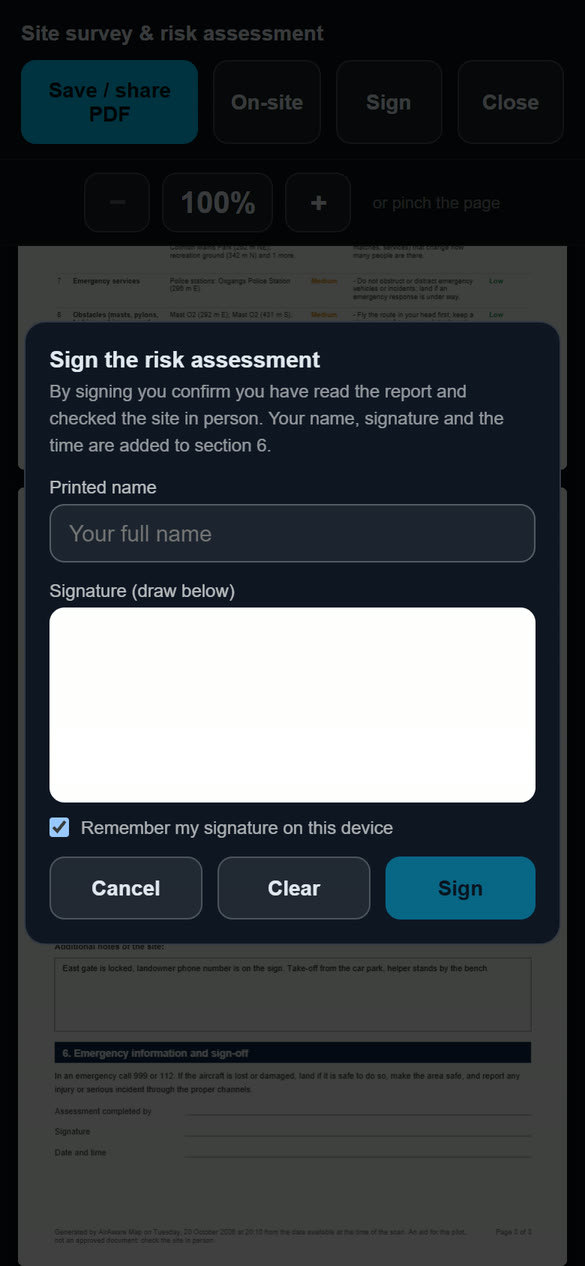
- Tap Sign.
- Check the printed name. It is filled in from Your name on the Account page if you have saved one.
- Draw your signature with your finger or a mouse. Clear starts again.
- Leave Remember my signature on this device ticked to reuse it next time; a Use my saved signature button then appears.
- Tap Sign. Your name, signature and the time are added to section 6, and the preview confirms "Signed".
The button then reads Re-sign. By signing you confirm you have read the report and checked the site in person. The signature is saved with the plan's assessment, so it still shows when you reopen it.
Chapter 8 ProFlight Log
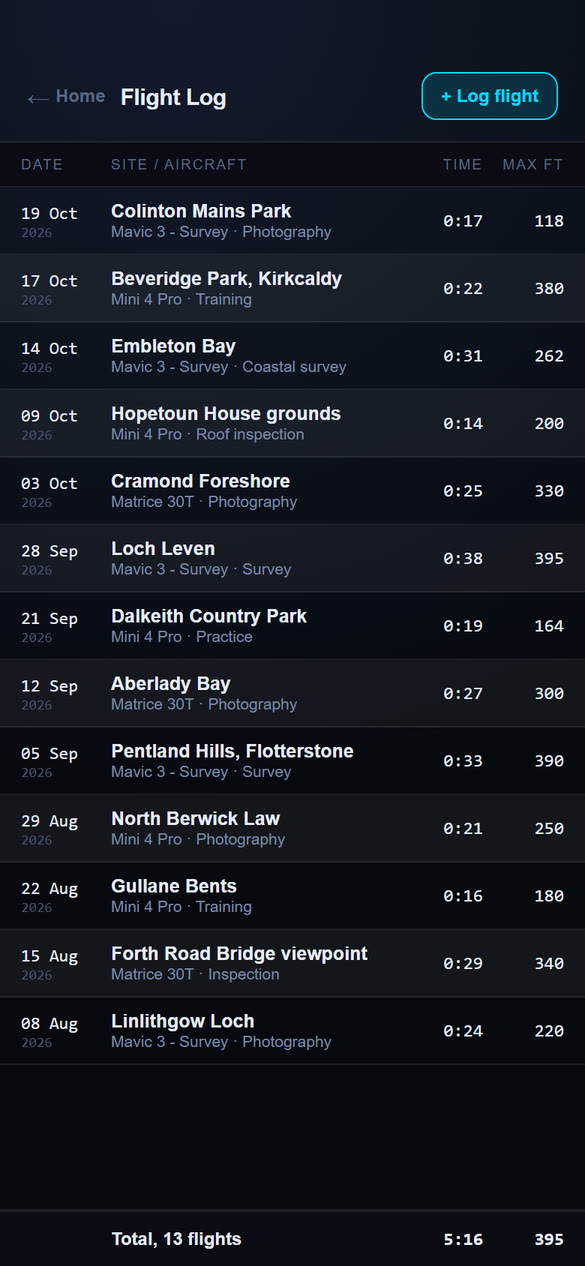
Your own record of the flights you have flown, laid out like the pages of a paper pilot logbook: a tight table with the newest flight first and your running totals at the bottom. The Flight Log is a Pro feature. It is included in Pro and does not use any tokens.
Reading your log
Open Flight Log from the Home screen. Each row is one flight, with four columns:
| Date | The day and month, with the year underneath. |
| Site / aircraft | The site in bold, then the drone and the purpose. |
| Time | The flight time in hours and minutes, for example 0:17 for 17 minutes. |
| Max | The highest height of the flight, in feet or metres (see Settings). |
The heading row stays at the top and the totals bar stays at the bottom as you scroll. It shows the number of flights, your total flying time and your highest flight.
Logging a flight
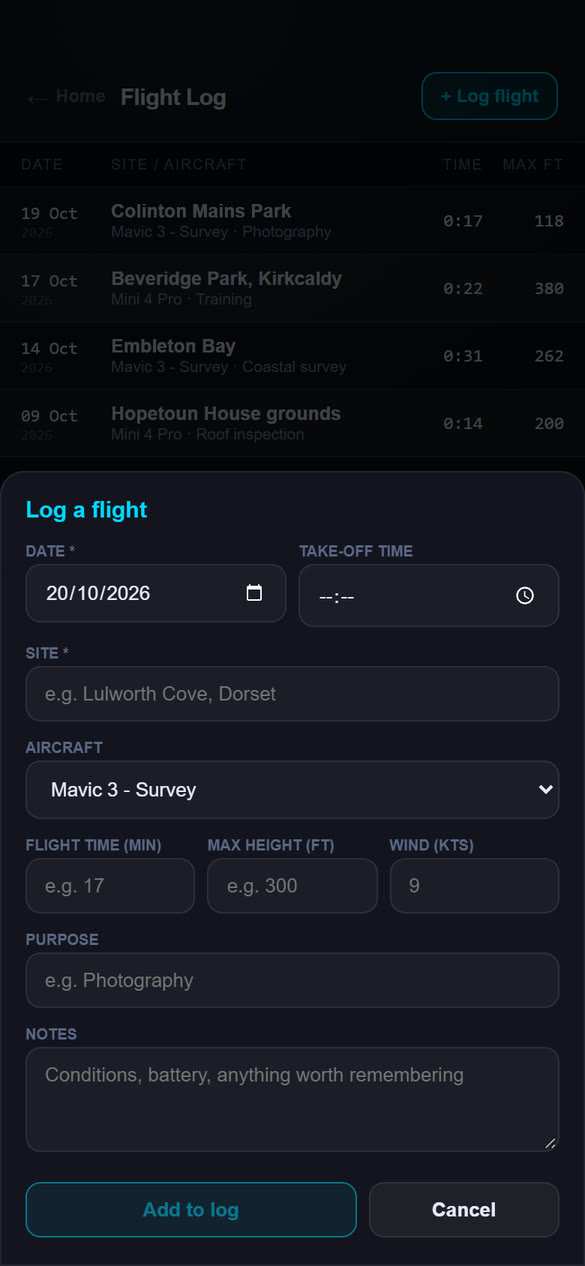
- Tap + Log flight.
- Check the date (today by default) and enter the take-off time if you want it.
- Type the site. The date and the site are the only required details.
- Choose the aircraft from the drop-down. It lists the drones in your Equipment list and starts on your active drone. (If you have not added a drone yet, you can type a name instead.)
- Enter the flight time in minutes, the maximum height and the wind, in the units you chose in Settings.
- Add a purpose (for example photography, survey, inspection or training) and any notes, such as conditions or battery use.
- Tap Add to log.
Editing and deleting
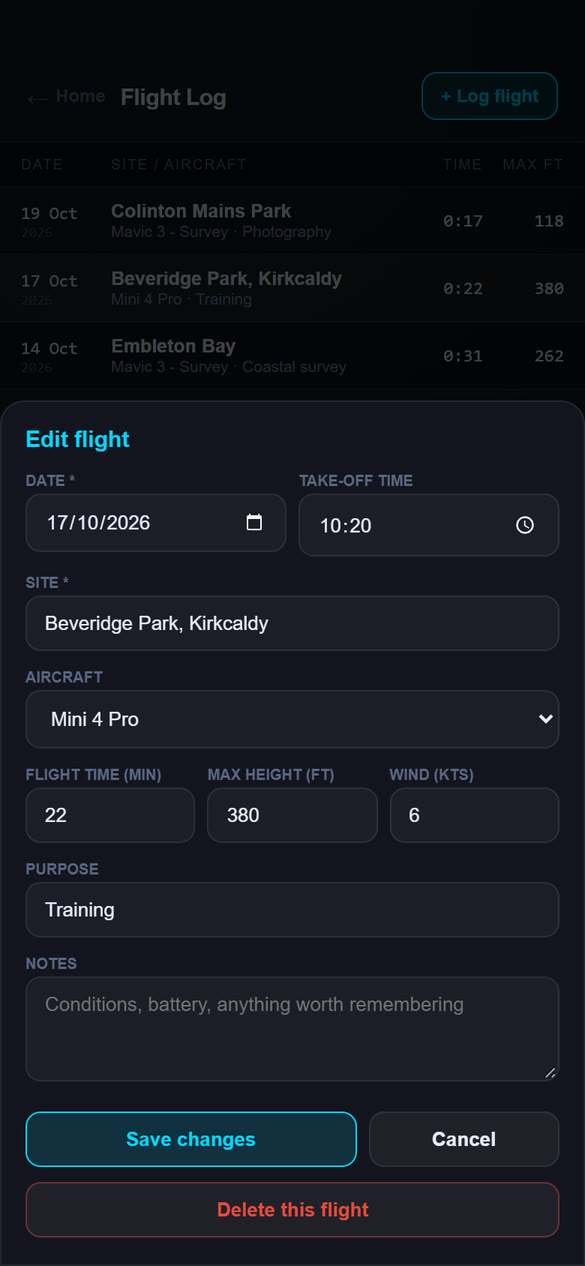
Tap any row to open it. Change what you need and tap Save changes, or tap Delete this flight and confirm to remove it.
Exporting your log
Tap Export at the top of the Flight Log (it appears once you have logged a flight). Choose which flights to include: All flights, This year, Last 12 months or Choose dates and pick a start and end date. The count under the dates shows how many flights will be included.
- PDF logbook is a printable table in date order (oldest first) with your username, the dates covered, a totals row and the flight count, total time and highest flight.
- CSV spreadsheet opens in Excel or Google Sheets, with one row per flight.
Heights and wind use the units chosen under Settings on the Account page. In the phone app, a share sheet opens so you can save the file to Files or send it by email. In a web browser the file downloads to your Downloads folder.
Where your log is kept
Your flight log is saved to your account, so it appears on every device you sign in on and is visible only to you. There is no limit to the number of entries, and they stay until you delete them or delete your account, even after the flight plan they came from has been deleted (Chapter 7). With no signal, a new entry is kept on your phone and a note says so; open the Flight Log again when you are back online.
Chapter 9 ProMessaging
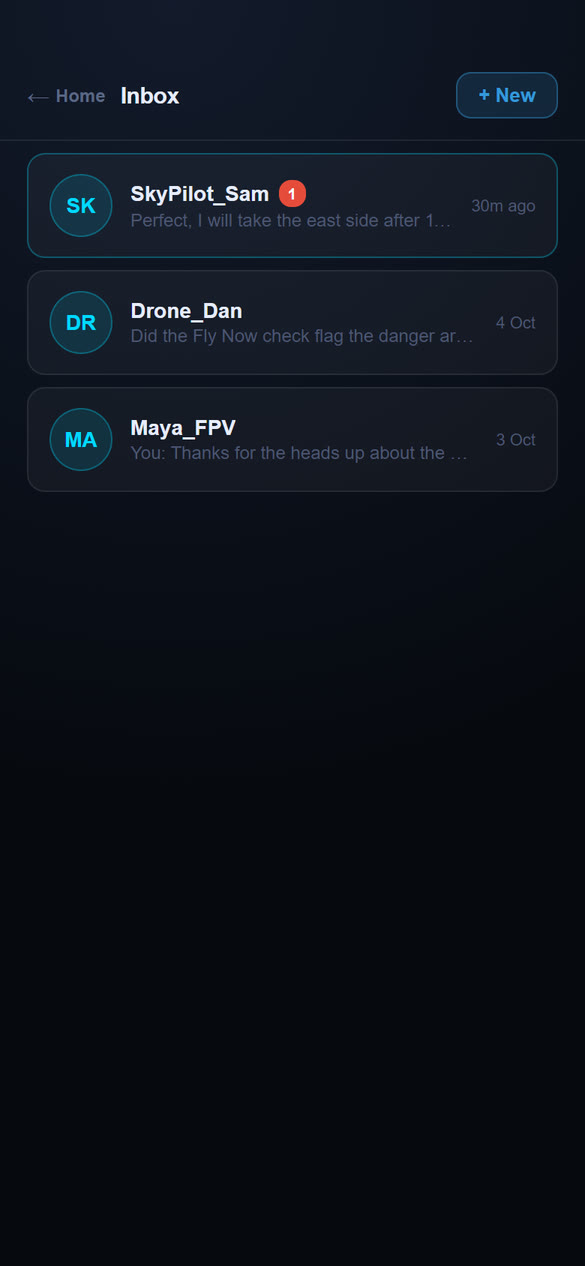
Message other AirAware pilots, for example to agree who flies where. Messages are between two pilots at a time.
Before you start
You need a Pro plan and a username. Other pilots see your username, not your email. Choose it on the Account page (Chapter 10). On the Free plan you can read messages sent to you but cannot send them.
Sending and reading messages
- To message a pilot from the map, tap their Planned flight marker and tap Message. Type your message and send it.
- To start from the Inbox, open Inbox and tap + New, type the pilot's username and tap Start Conversation.
- Your conversations are listed with the latest message and its time. A red number shows unread messages. Tap one to open it.
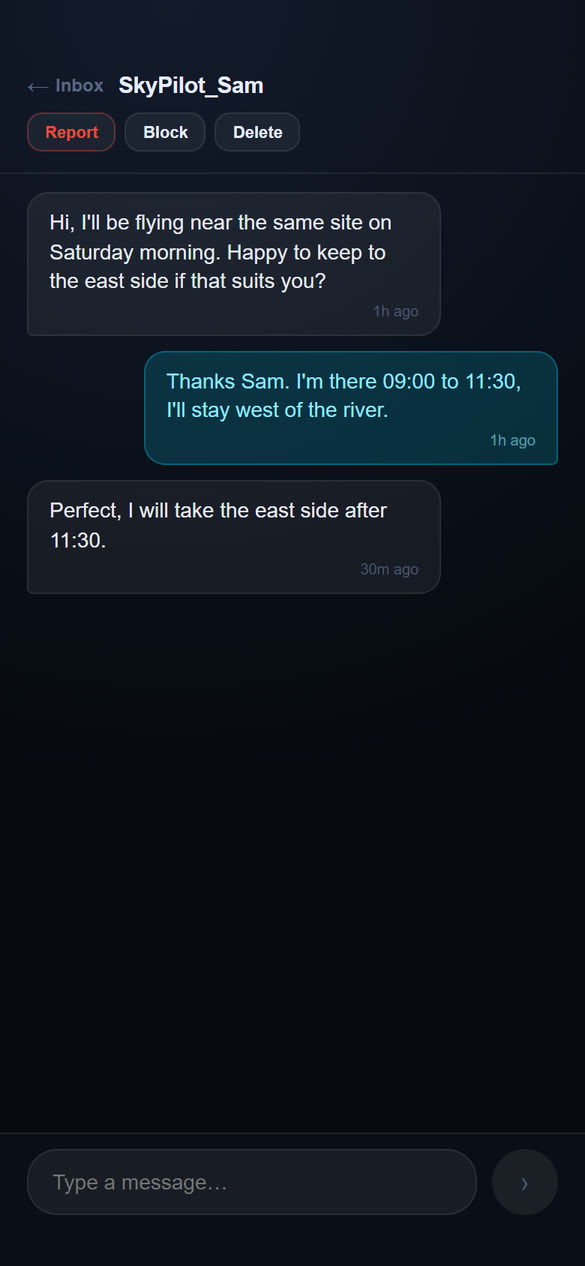
- Type in the box at the bottom and send. New messages appear while the conversation is open.
Keeping it civil
At the top of a conversation:
- Report tells us about abusive messages. You can add details.
- Block stops that pilot messaging you. You will not receive their messages.
- Delete removes the conversation for you.
You can see and undo your blocks under Blocked pilots on the Account page.
Chapter 10Your account
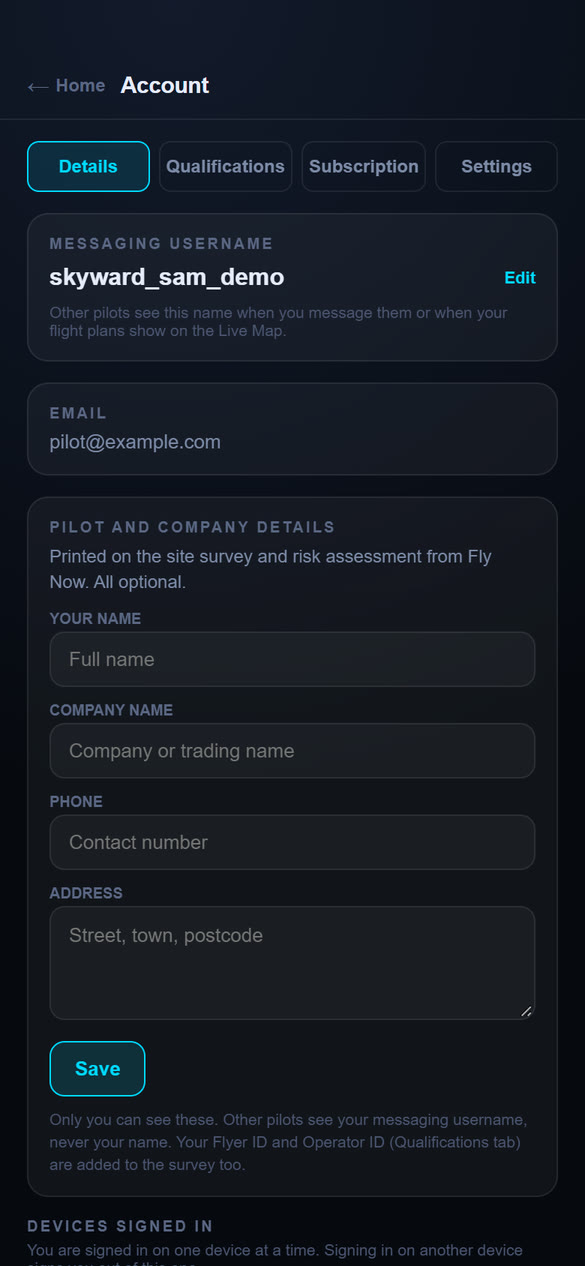
Open Account from the Home screen. It has four tabs along the top: Details, Qualifications, Subscription and Settings.
Details
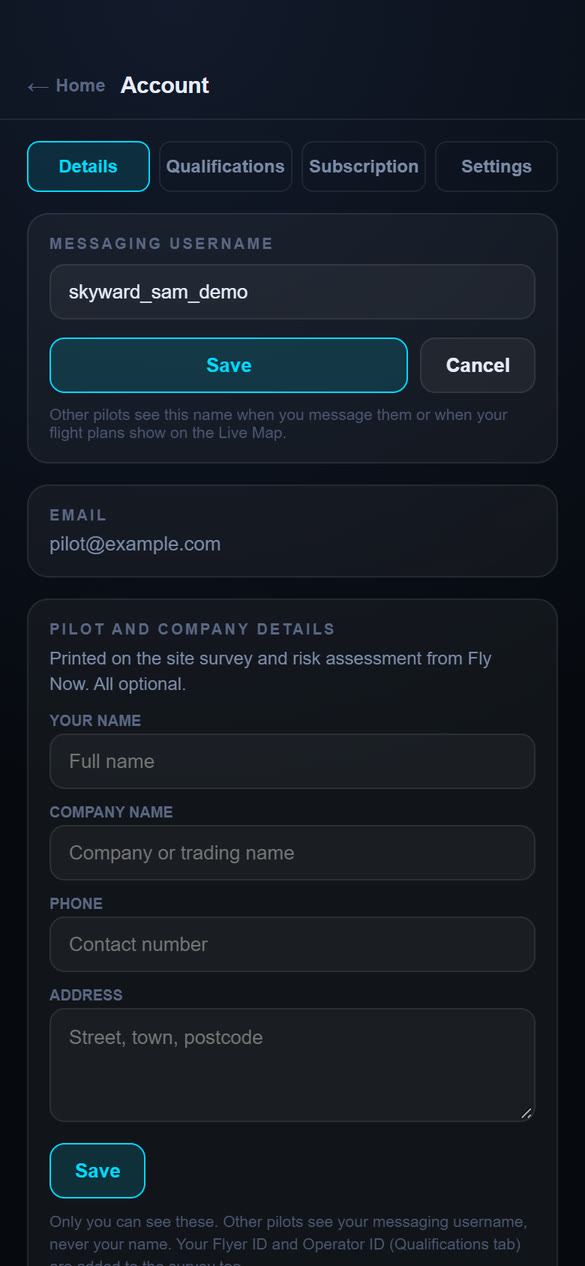
Your username
Your username is the name other pilots see when you message them or when your plans show on the map. To set or change it, tap Edit, type a name and tap Save. It must be 3 to 20 characters (letters, numbers, underscores or hyphens) and not already taken; the app checks as you type. A Free account chooses its username when it upgrades, because messaging is a Pro feature.
Email, and your pilot and company details
Your email address is shown for reference. Under Pilot and company details you can save your name, company or trading name, phone number and address. They are printed on the risk assessment for each flight plan (Chapter 7), and are all optional. Only you can see them. Other pilots see your username, never your name.
Devices signed in
Lists the device your account is signed in on, marked This device, and when it was last seen. An account is signed in on one device at a time (Chapter 2).
Blocked pilots
Lists pilots you have blocked. Tap Unblock to let them message you again.
Qualifications
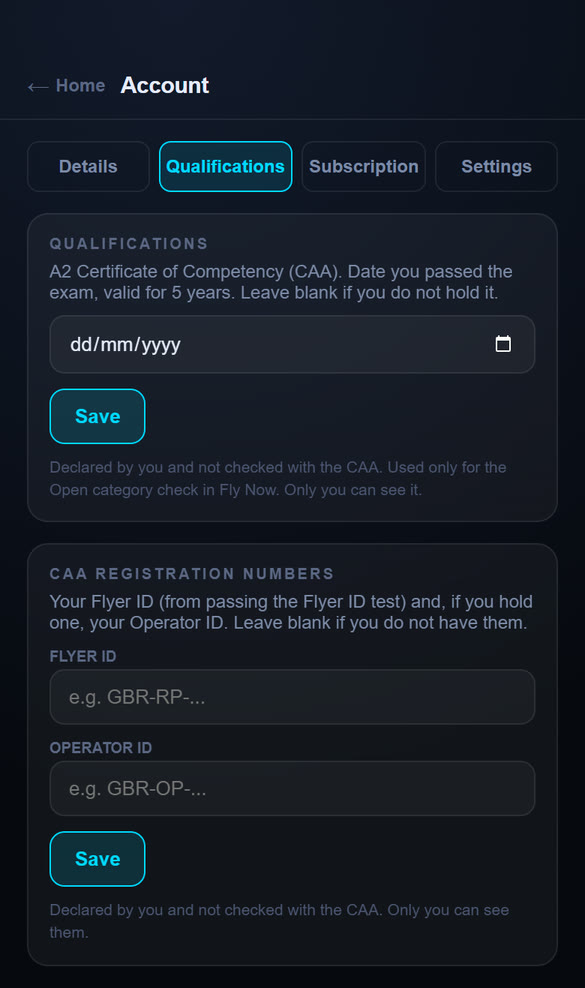
- A2 Certificate of Competency. If you hold the CAA's A2 CofC, enter the date you passed the exam and tap Save. It counts as valid for five years; the app warns you if the date is older than that. The Open category check in Fly Now uses it to decide whether A2 is available to you (Chapter 4). Leave it blank if you do not hold it.
- CAA registration numbers. Your Flyer ID (from passing the Flyer ID test) and, if you hold one, your Operator ID. They are printed on the risk assessment.
All of these are declared by you. AirAware does not check them with the CAA, and only you can see them.
Subscription
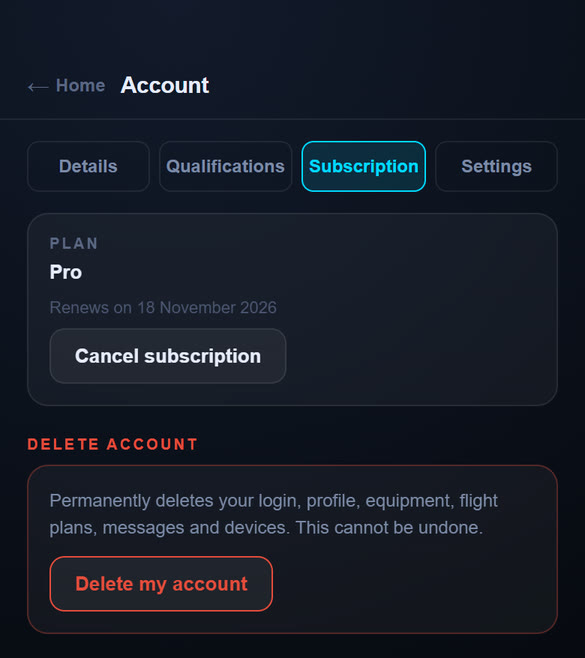
The Plan card shows Free or Pro. On the Free plan it also shows your token counter. During the 72-hour start it says how many hours of full access are left.
- If you subscribed on the website, the card shows when it renews, with a Cancel subscription button. Cancelling asks you to confirm, then you keep Pro until the end of the period you have paid for, after which your account moves to Free. Changed your mind? Tap Keep my Pro plan before then.
- If you subscribed in the phone app, the card says Subscribed through the App Store or Google Play, with the renewal date, and a Manage subscription button that opens your store's subscription settings, where you can change or cancel it. If a renewal payment fails, the card tells you to update your payment method in the store.
- On a Free account in the phone apps, Upgrade to Pro opens the upgrade screen (Chapter 11).
Deleting your account
At the bottom of the Subscription tab, Delete account permanently deletes your login, profile, drones, flight plans, flight log, messages and devices. It cannot be undone. To confirm, type your email address and tap Permanently delete.
Settings
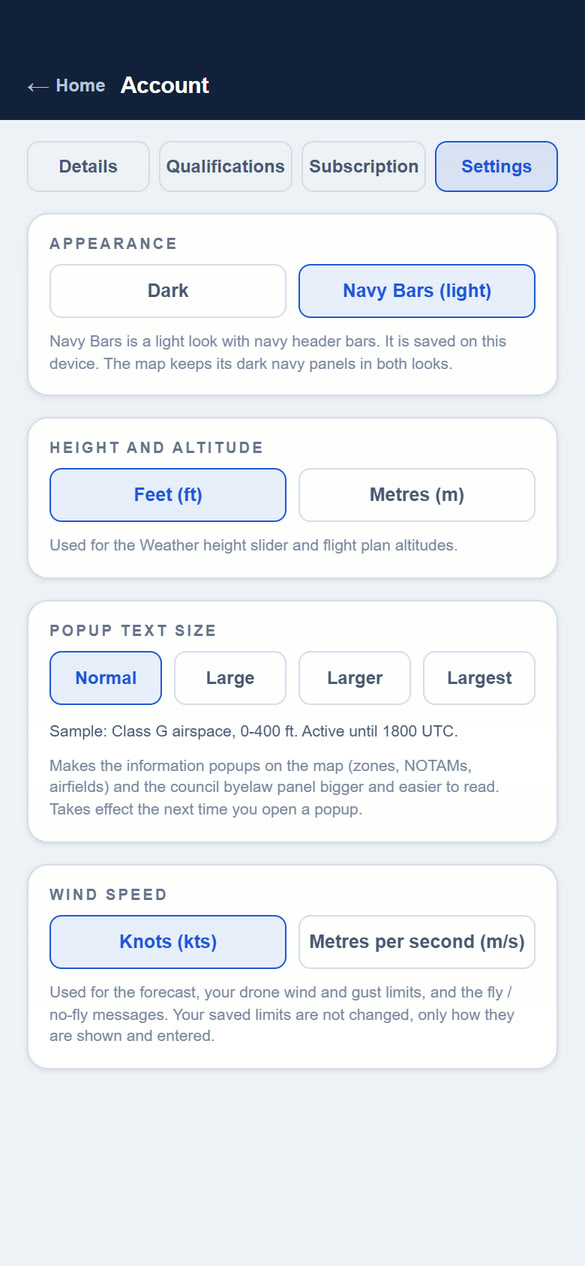
These choices are saved on the device you are using.
| Appearance | Dark, or Navy Bars (light): a light look with navy header bars, easier to read in bright sunlight. The map keeps its dark navy panels in both looks. You can also switch from the Dark / Light switch on the login screen. |
| Height and altitude | Feet or metres. Used for the Weather height slider, flight plan altitudes and the Flight Log. |
| Popup text size | Normal, Large, Larger or Largest. Makes the information popups on the map (zones, NOTAMs, airfields) and the council byelaw panel bigger. A sample line shows the size. |
| Wind speed | Knots or metres per second. Used for the forecast, your drones' wind and gust limits, and the fly or no-fly messages. Your saved limits are not changed, only how they are shown and entered. |
Chapter 11Free and Pro plans
Start free, and upgrade when you want unlimited checks and the Pro features. Free is a permanent plan. A new account also gets full Pro access for its first 72 hours, then moves to Free unless you subscribe.
| Free | Pro (£3.99 a month) | |
|---|---|---|
| Live Map and all layers | Unlimited | Unlimited |
| Fly Now checks (with the Open category check), weather forecasts and flight plan risk assessments | 20 tokens a month, shared | Unlimited |
| Wind at height and the 24-hour forecast | Yes | Yes |
| 7-day forecast | No | Yes |
| Risk assessment for each flight plan | 1 token the first time, then free to reopen | Unlimited |
| Drones in Equipment | 1 | Unlimited |
| Publish your own flight plans, and see other pilots' plans on the map | Yes | Yes |
| Flight Log | No | Yes (no tokens needed) |
| Message other pilots | No (you can read messages) | Yes |
Free tokens reset at the start of each calendar month. A token is only spent once a check or forecast has actually loaded, and repeating the same check for the same place within 5 minutes is free.
Upgrading to Pro
In the iPhone or Android app
- Open Account, go to the Subscription tab and tap Upgrade to Pro. (On a Free account the token counter also has an Upgrade to Pro for unlimited link.)
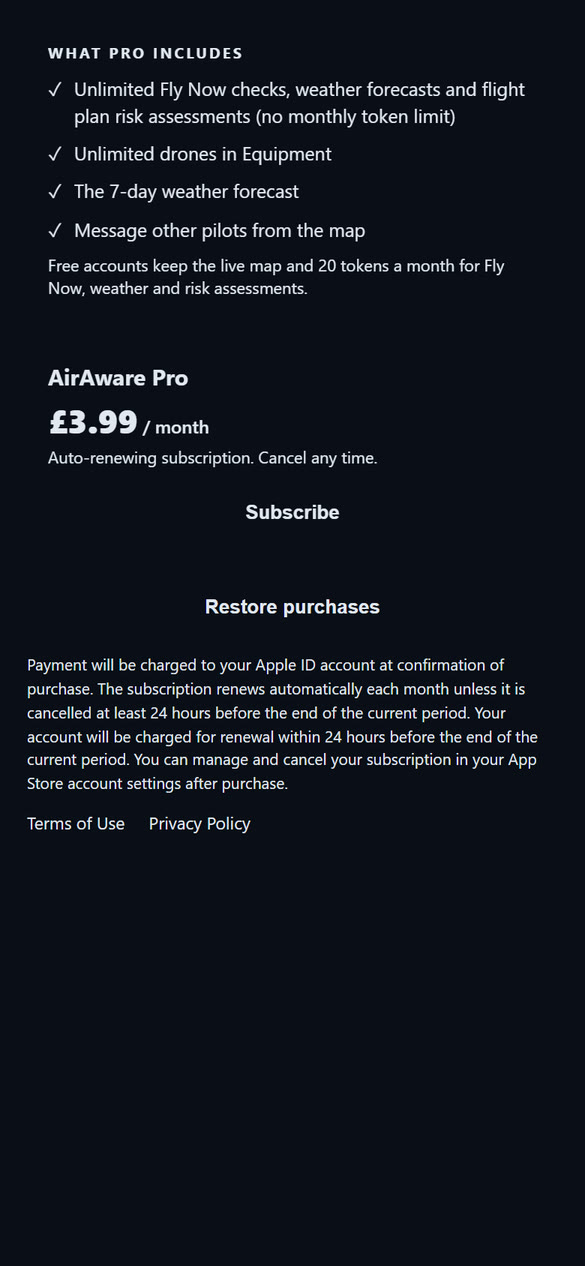
- The upgrade screen lists what Pro adds and shows the price and period from the store, with the renewal terms and links to the Terms and Privacy policy.
- Tap Subscribe and confirm with your Apple ID or Google account, the way you would for any other subscription.
- The app says "Switching on Pro...". It can take a minute. Check your Account page; if it still shows Free, go back to the upgrade screen and tap Restore purchases.
Use Restore purchases too if you reinstall the app or move to a new phone. The subscription belongs to your store account and is linked to your AirAware login, so Pro applies wherever you sign in. Where it is offered, the same screen also lets you buy a one-off pack of 10 extra tokens, used after your 20 free tokens for the month and kept until you spend them.
On the website
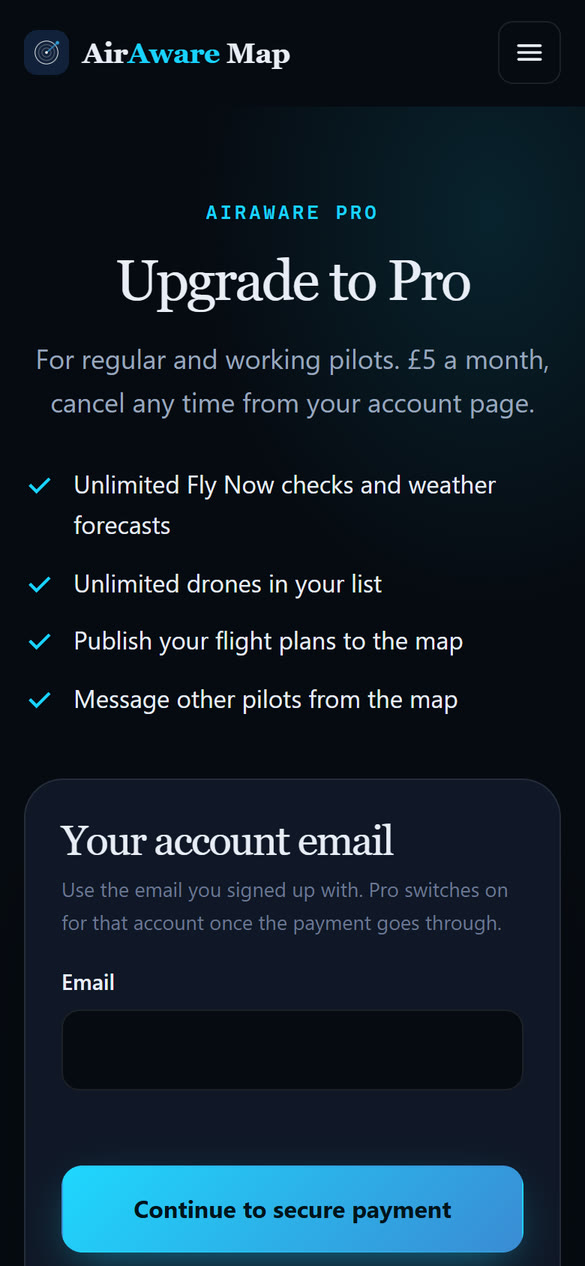
- Open the AirAware Map website and go to the Upgrade to Pro page.
- Enter the email address you signed up with and tap Continue to secure payment.
- Pay on the secure payment page. Your card details are entered there only, never in the app.
- Return to the app. Your account switches to Pro for that email address. If it still shows Free, log out and back in.
You can also choose Pro when you first create your account (Chapter 2).
Cancelling
If you subscribed on the website, open Account, go to the Subscription tab, tap Cancel subscription and confirm. If you subscribed in the phone app, tap Manage subscription in the same place (or open the subscriptions section of the App Store or Google Play). Either way you keep Pro until the end of the period you have paid for. Your account then moves to Free: you keep your data, but the Free limits apply again, so you can no longer add more drones, send messages or add Flight Log entries (your entries are kept), and the 7-day forecast and unlimited tokens stop.
Chapter 12Troubleshooting and questions
The app can't find my location
Fly Now and the blue pin need your device's location. If the app says "Location access is blocked for this site", allow location for the app or website:
- iPhone / iPad: Settings → Privacy & Security → Location Services, make sure it is on, then find your browser (or the app) and choose While Using.
- Android: long-press the app or browser icon → App info → Permissions → Location → Allow while using.
- Computer: click the padlock icon in the address bar and allow location for the site.
Then tap Try Again. If the check says your location timed out, move somewhere with a clearer view of the sky and try again. You can also drop a pin on the map and check that spot instead.
Common questions
- I upgraded to Pro but my account still says Free.
- If you paid on the website, check that you used the same email address as your account, then log out and back in. If you subscribed in the phone app, open the upgrade screen and tap Restore purchases. If it is still Free after a few minutes, contact support with the email you used.
- I was signed out and I did not log out.
- An account is signed in on one device at a time, so logging in on another phone or tablet signs the first one out (Chapter 2). Log in again. If it was not you who logged in elsewhere, change your password.
- I used all my free checks.
- Free accounts get 20 tokens a month to spend on Fly Now checks, weather forecasts and flight plan risk assessments, in any mix. A counter on Home, Account and Flight Plans shows how many are left. They reset at the start of each month, or upgrade to Pro for unlimited (Chapter 11).
- A token was used but I got no result.
- A token is only spent once the data has loaded, so a failed forecast or a location problem should not use one. Repeating the same check for the same place within 5 minutes is also free. If a token went missing, tell us with Report bug on the Home screen.
- The Flight Log asks me to upgrade.
- The Flight Log is a Pro feature and does not use tokens. Upgrade to Pro (Chapter 11) and it opens straight away, with any entries you already made.
- I can't send a message.
- Messaging is a Pro feature and also needs a username (Chapter 10). On the Free plan you can read messages but not send them.
- My flight plan has gone.
- A plan leaves the map when it ends and its tile is deleted 14 days later (Chapter 7). Download the risk assessment before then, and record the flight in your Flight Log, which is kept until you delete it.
- The risk assessment ran a new scan.
- A saved assessment reopens without a scan. A new scan happens if you moved the plan's site or changed its area, or if the plan never had a saved assessment (for example one made before this feature). On the Free plan a new scan uses one token.
- A flight log entry is missing on my other device.
- Entries sync through your account. If an entry was saved with no signal, the Flight Log says it is only on that phone; open the Flight Log there once you are online. Also check that both devices are signed in to the same account.
- The Open category card says A2 is not available.
- A2 needs your A2 Certificate of Competency (add the date under Qualifications on the Account page) and a drone that qualifies, such as a UK2 class mark (set it on the Equipment page) or an older drone under 2 kg.
- A zone I expected isn't on the map.
- Check the Layers panel: the layer may be switched off. Danger areas and temporary zones can look amber until a NOTAM activates them. Tap the spot to read each zone's card.
- The map is blank or very slow.
- Check your connection and reload. The map downloads its detail as you move around. If you are on mobile data with a weak signal, wait a moment, or zoom out and in again.
- The forecast doesn't match what I see outside.
- Forecasts are models for a general area and can differ at your exact spot. Always look at the sky and conditions on the day.
- I forgot my password.
- Use Forgot password? on the login screen (Chapter 2).
- Something looks wrong or I have an idea.
- Use Report bug or Feedback at the bottom of the Home screen.
Chapter 13Glossary
- AGL / AMSL
- Above Ground Level / Above Mean Sea Level: how a height is measured. Drone altitude limits are normally above ground.
- AIP supplement
- An official notice published by the UK authorities, for example for a temporary danger area. They appear in the AIP Supplements layer.
- ATZ / MATZ
- Aerodrome Traffic Zone / Military ATZ: airspace around an airfield where take-offs and landings are controlled or coordinated.
- BVLOS
- Beyond Visual Line of Sight. Flights where the pilot cannot see the aircraft. They usually need a temporary danger area.
- CTR / CTA
- Control Zone / Control Area: controlled airspace around busy airports.
- A1 / A2 / A3
- The three subcategories of the Open category. They set which drones can fly, how close to people and buildings, and what training you need. See Chapter 4.
- A2 CofC
- The A2 Certificate of Competency, a CAA qualification needed to fly some drones closer to people in subcategory A2. Valid for five years.
- Class mark
- A label (UK0 to UK6, or C0 to C6) on newer drones that says which Open category rules they meet.
- Danger area
- Airspace where activity may be hazardous to aircraft. Many are active only when a NOTAM says so.
- Drone Code
- The CAA's rules and guidance for flying drones in the UK.
- Flyer ID / Operator ID
- Your CAA registration numbers. The Flyer ID shows you passed the CAA's online test; the Operator ID registers the person responsible for the drone.
- FRZ
- Flight Restriction Zone: protected airspace around an aerodrome where drones may not fly without permission.
- GNSS
- The global satellite navigation systems (GPS, Galileo and others) your drone uses to know where it is.
- HIRTA
- High Intensity Radio Transmission Area: a site with strong radio transmissions that can interfere with a drone.
- Kp index
- A 0 to 9 measure of disturbance to the Earth's magnetic field. Higher values can disturb GPS and the compass.
- kts
- Knots (nautical miles per hour). 1 knot is about 1.15 mph.
- NOTAM
- Notice to Air Missions: a short-term notice about a hazard or restriction, such as an activated danger area.
- Open category
- The CAA category for lower-risk drone flights. It has rules about distances from people, height and keeping the drone in sight.
- SSSI
- Site of Special Scientific Interest: a protected site for wildlife or geology.
- Token
- A unit of use on the Free plan. 20 a month pay for Fly Now checks, weather forecasts and the first risk assessment of each flight plan, in any mix. Pro is unlimited.
- TDA / TRA
- Temporary Danger Area / Temporary Reserved Area: airspace set aside for a limited period, often for drone trials.
- VLOS
- Visual Line of Sight: keeping your drone in view at all times, the normal requirement.
Chapter 14Important notice and data sources
Please read
AirAware Map is provided as guidance only. It is not an official aeronautical source, it does not give permission to fly, and it does not replace the Drone Code, the Air Navigation Order, official NOTAMs or your own judgement. Its data comes from third parties and public sources and may be delayed, incomplete or wrong. The Fly Now result, the Open category check, the weather verdict and the site survey and risk assessment are aids to your own decision. Your qualifications, IDs and class marks are as you declared them and are not checked.
You remain responsible for the safe and lawful operation of your aircraft, for obtaining any permission you need (from air traffic control, an airfield, a landowner or a council), for holding the registrations and qualifications your flight requires, and for checking official sources immediately before you fly.
Where the data comes from
| Information | Source |
|---|---|
| Airspace, NOTAMs, temporary danger areas and AIP supplements | Official UK aeronautical information (NATS AIS and CAA publications), republished by AirAware Map and refreshed regularly |
| Base map, parks, schools, hospitals, obstacles and most ground features | © OpenStreetMap contributors, with map tiles derived through OpenMapTiles |
| Buildings used by the Open category check | © OpenStreetMap contributors |
| Weather forecast | Open-Meteo |
| Place names and search | Geoapify, using OpenStreetMap data |
| Kp (space weather) | GFZ Potsdam |
| Council drone rules | Researched from each council's published information. Check the council's own pages |
Airspace and NOTAM information is refreshed regularly but is only as current as the publication it comes from. Always check the official source before flying.